Making Christmas cards are a great way to use up your left over scraps and Christmas stickers while creating personalised greetings for your loved ones.
However, making Christmas cards can be a little overwhelming simply because of the sheer number of cards on your ‘to make’ list. Card making sketches give you that spark of inspiration that help you create stunning cards quickly and easily so you can be sure none of your loved ones miss out.
Click Here To Purchase Your Copy Of 50 Card Making Sketches
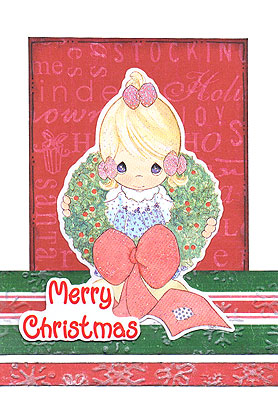
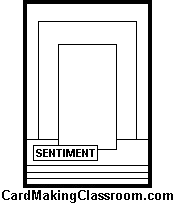
For example, this Christmas card was based on the sketch next to it:


Materials Used: White Bazzill cardstock, Bo Bunny Red Tidings paper, Bo Bunny Christmas Brights Stripes paper, white cardstock, a black ink pad, a black pen, foam tape, Fiskars Snowflake Texture plate, silver ink, glitter and Sandylion Precious Moments Christmas stickers.
To create this card based on this sketch:
1. Cut a piece of white Bazzill cardstock measuring 15cm by 20.6cm. Fold in half to create a card.
2. Cut a piece of Bo Bunny Red Tidings paper measuring 8.3cm by 10cm. Ink the edges with black ink. When dry, draw a dashed border all the way with a black pen. Glue to the front of your card so that it is centred horizontally and about 1.6cm from the top edge.
3. Cut a piece of Bo Bunny Christmas Brights Stripes paper measuring 10.5cm by 3.1cm.
OPTIONAL STEP: Using a texture plate or embossing template, dry emboss your stripes paper with snowflakes. Lightly ink the raised snowflakes with a silver ink pad and allow to dry.
4. Ink the top and bottom edges of the stripes paper from step #3 with black ink. When dry, glue across your card approximately 1.9cm from the bottom edge.
5. Cut another piece of Bo Bunny Christmas Brights Stripes paper measuring 10.5cm by 1cm. You really just want a red strip here.
OPTIONAL STEP: Using a texture plate or embossing template, dry emboss your red strip with snowflakes. Lightly ink the raised snowflakes with a silver ink pad and allow to dry.
6. Ink the top and bottom edges of the red strip from step #5 with black ink. When dry, glue across your card approximately 0.6cm from the bottom edge.
7. Place your Precious Moments sticker on white cardstock and cut out, making sure you give it a white outline. Position on your card as shown above and glue in place. If you wish, you may use glitter to add some sparkle to your sticker. I have added glitter to the hair and red ribbon.
8. Place your ‘Merry Christmas’ sticker on white cardstock. Cut out and attach towards the bottom left corner of your card with foam tape. This gives your card a little more dimension.
When using a card making sketch, the hard part of your design has been taken care of. You don’t have to figure out to arrange everything to look its best – you can focus on playing around with colours, patterns and textures.
It makes card making so much more fun and a lot easier. Plus, sketches allow you to create spectacular cards quickly, making that long Christmas ‘to make’ list a breeze.
For more card making sketches and instructions, grab a copy of my new book, 50 Card Making Sketches and let me help you create inspired Christmas cards your loved ones will absolutely adore.
Click Here To Purchase Your Copy Of 50 Card Making Sketches Now
I’d love to hear your ideas for making Christmas cards. Please leave a comment in the comments box below.


I never thought that making own card is easier. I have tried this as an experiment but it did nt work. Thereby i am using the iHappy Holidays for sending wonderful collection of egreetings.
Hi just wanted to give you a brief heads up and let you know a few of
the pictures aren’t loading properly. I’m not sure why but I
think its a linking issue. I’ve tried it in two different browsers and both show the same results.