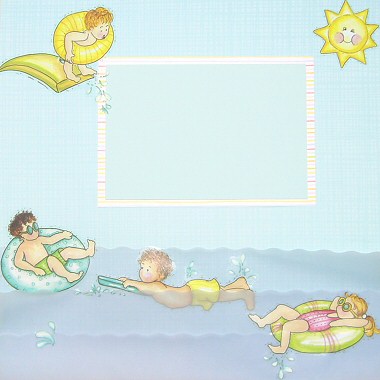
Looking for scrapbooking ideas to showcase photos of your kids at the pool or water park? Vellum is the perfect medium for creating water effects on your page. In this layout, I show you how to use it in combination with Bo Bunny stickers to create a scene of children swimming across the bottom of your page. It’s so easy! And incidentally, these stickers come with little extras so you can change the boys to girls if you wish.
This layout was created using blue patterned paper, blue cardstock, Creative Imaginations Stripes paper, blue vellum and Bo Bunny Watch Me stickers. Wave scissors would also be helpful but not essential.
To recreate this scrapbook page idea, follow these steps:
1. Use the blue patterned paper as your background.
2. Cut three strips of vellum – one approximately 4cm tall, one approximately 7cm tall and another approximately 10cm tall. When cutting each strip, give the top edge a wavy effect. This can be done with a template, or more easily, with wavy scissors.
3. Place the largest strip of vellum across the bottom of your page. Adhere to the background by placing glue in the top left (behind where the sticker will be). This is enough to keep the vellum in place, but you can also place a dab of glue in the areas the other stickers will cover if you want to attach it more securely.
4. Next, place the boy in the blue tube sticker in the top left corner of the vellum strip. Half of this sticker goes onto the vellum and half onto the background paper, again helping to secure the vellum. Try to place the sticker so the next layer of vellum will slightly overlap it.

5. The second layer of vellum is the most difficult to attach as the sticker is going both on top of and below the vellum. This way, the boy looks like he is swimming in the water, but his board and the water splats are on top of the water. In order to do this, all you need to do is make a small cut on the sticker from the curve around the water splats to the board.
6. Now to adhere the second layer of vellum to your layout by placing a dab of glue on the right side (where the third sticker will cover) and attaching it to your layout. Adhere your sticker to the first layer of vellum, as shown above, remembering to lift the board end to stick on the new layer.
7. Now attach the third layer of vellum. Again, dab some glue on the right (where the third sticker will cover) and attach to your layout.
8. Add your third sticker to the bottom right and the small water splash sticker on the left. If you are worried the vellum is not stuck down well enough, you can always apply more glue behind any of the stickers.
9. Mat your photo, first with blue cardstock and then with Creative Imaginations Stripes paper. Glue to your page above the waves, as shown above.
10. Place the boy on the diving board sticker in the top left corner of your page and the sun sticker in the top right corner.
What do you think? Do you like this vellum scrapbooking idea? Do you have any questions? Would you have done anything different? We’d love to hear from you! Please leave a comment below.


Wonderful tip!
Yeah!!! what a great page idea. Just the thing that I need to do the Jamberoo water park photos from last summer. You have solved my problem of not so ho hum summer pages. Great page idea. Thanks.