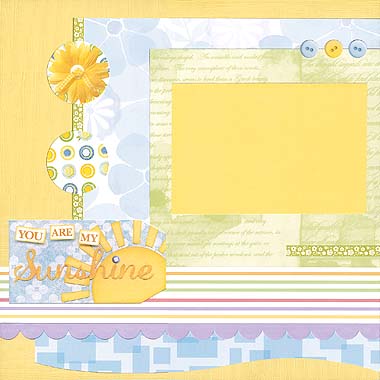
I love creating feel-good layouts with scrapbooking stickers as they are generally quite quick to complete, a lot of fun and still look good when I’ve finished. This page is no exception. The happy co-ordinating colours combined with the layering of different patterns and some stickers highlight the ‘sunshine’ theme of this page and just make me want to smile. I hope you like it too!
This layout was created using yellow Bazzill cardstock, Sandylion Light Blue Floral paper, Mustard Moon Green paper, American Crafts Girly Stripes paper, Provo Craft Blue Squares paper, yellow cardstock and Bo Bunny You Are My Sunshine stickers.
To recreate this scrapbook page idea, follow these steps:
1. Use the yellow Bazzill cardstock as your background.
2. Cut a square of Sandylion Light Blue Floral paper measuring approximately 24cm by 24cm. Adhere to the background up against the right edge and approximately 1.5cm from the top edge.
3. Cut out the green ribbon sticker from your sheet of Bo Bunny You Are My Sunshine stickers. Trim it so you have one piece approximately 20cm long and another approximately 7.5cm long. Set aside the small piece for later use. Stick the large piece vertically along the left edge of the Sandylion Light Blue Floral paper. Make sure the top edge of the paper and the sticker are aligned with each other, as shown in the layout above.
4. Cut a square of Mustard Moon Green paper measuring approximately 18.5cm by 18.5cm. Adhere to the background up against the right edge and approximately 4cm from the top edge.
5. Cut a piece of Provo Craft Blue Squares paper measuring approximately 27.5cm by 5cm. Cut the bottom edge in a curve shape, as shown in the layout above. To create the curve you can use a template or draw the line yourself as I did. Glue to your layout so that it is up against the right edge and the lowest point of your curve is approximately 0.6cm from the bottom edge.
6. Cut a strip of American Crafts Girly Stripes paper approximately 2cm tall. Turn it upside down to show the plain purple underside. Cut a scalloped edge along the bottom edge of this strip. You can draw one freehand, use a template or use a punch to create this effect. When done, glue horizontally to your layout approximately 3.5cm from the bottom edge. Your scalloped edge should be overlapping with your Blue Squares paper.
7. Cut a second strip of American Crafts Girly Stripes paper approximately 4.5cm tall. Glue to your page approximately 4.5cm from the bottom edge and overlapping the top edge of your scalloped strip.
8. Mat a 4×6 photo with yellow cardstock. Glue horizontally to your page approximately 1.2cm from the right edge and 6.7cm from the top edge.
9. Place the three button stickers towards the top right corner of the page, so that they overlap the Blue Floral paper and the Green paper.
10. Place the ‘You Are My Sunshine’ sticker towards the bottom left corner of the page approximately 0.8cm from the left edge and 6.2cm from the bottom edge.
11. Place the two circle stickers, one above the other along the vertical green ribbon sticker, as shown in the layout above.
12. Finally, place the small green ribbon piece that you set aside previously approximately 2.5cm below your photo and up against the right edge.
What do you think? Do you like this scrapbooking idea? Do you have any questions? Would you have done anything different? We’d love to hear from you! Please leave a comment below.


Where do you get “You are my sunshine” stickers?