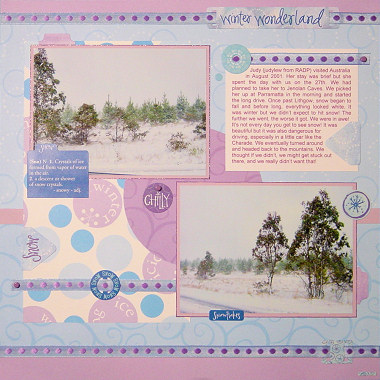
Snow stickers are the perfect embellishment for those cold, wintery photos. And they look even better when combined with scrapbooking ribbons. Reminisce stickers tend to work very well with ribbon as many designs feature ribbon buckles and other elements through which you can thread ribbon.
Click Here To View Our Full Range Of Reminisce Stickers
In this layout, I have combined snow stickers from Reminisce’s Winter Wonderland range with co-ordinating ribbon for an extra special effect.

Materials Used: Provo Craft patterned papers (blue circles, blue swirls and purple swirls), Queen and Company Winter Circles paper, two shades of purple cardstock, white cardstock, ribbon, purple brads, a purple glitter pen and Reminisce Winter Wonderland stickers.
To recreate this scrapbook page idea, follow these steps:
1. Use the darkest shade of purple cardstock as your background.
2. Cut a piece of Blue Circles paper measuring approximately 16.5cm by 30.5cm. Adhere across your page approximately 1.5cm from the top edge.
3. Cut a piece of Blue Swirls paper measuring approximately 11cm by 30.5cm. Adhere across your page approximately 2cm from the bottom edge. It should just touch your Blue Circles paper from the previous step.
4. Cut a strip of the light shade of purple cardstock measuring approximately 1.2cm by 30.5cm. Adhere it across your page over the join between your Blue Circles paper and your Blue Swirls paper.
5. Cut a piece of ribbon to go across the top of your page over the join between the Blue Circles paper and your background cardstock. Thread it through your ‘Winter Wonderland’ sticker, positioning the sticker so that it ends up towards the top right side of your page. Adhere in place.
6. Cut a second piece of ribbon, this time to go across the bottom of your page covering the join between your Blue Swirls paper and your background cardstock. Thread it through the smaller snowflakes buckle sticker, positioning the sticker so that it ends up towards the bottom right side of your page. Adhere in place.
7. Cut a piece of Winter Circles paper measuring approximately 13cm by 22.5cm. Adhere vertically on the left side of your page, as shown in the layout above.
8. Cut a circle with a diameter of approximately 11cm from the Purple Swirls paper and adhere towards the centre of your page (see above layout for exact positioning).
9. Cut a piece of ribbon approximately 15cm long. Thread the round snowy sticker through it and adhere across the bottom section of your Winter Circles paper. Use a purple brad to secure the left side of the ribbon in place (there is no need to use a brad on the right side as the right edge will end up behind your photo).
10. Mat your photos with light purple cardstock. Use a purple glitter pen to thinly outline your photo mat. When dry, position your photos as shown in the layout above and adhere.
11. Cut a rectangle of white cardstock measuring approximately 10.5cm by 10cm. Add your journaling, remembering to leave a space at the top and the bottom right corner for your snowy stickers. Adhere in the top right corner of your page, as shown in the layout above.
12. Cut a piece of ribbon approximately 11.5cm long and adhere across the top of your journaling block. Use a purple brad to secure the right side of the ribbon (there is no need to use a brad on the left side as the left edge will end up behind a sticker).
13. Finish off your page by adding the remaining snowy stickers. See the layout above for exact positioning. You may also like to include a purple brad through the hole of the ‘Chilly’ sticker to add a touch of dimension.
As you can see, the snowy stickers from Reminisce work really well with the ribbon. Of course, Reminisce stickers come in all sorts of themes. Choose your favourite and see what you can come up with.
Click Here To View Our Full Range Of Reminisce Stickers
I’d love to hear how you have used snow stickers in your layouts. Please leave a comment in the comments box below.


I invite to a site otkrytkin.pp.ua of the Card, gifts, a master class, make itself, the hands.
Пассажирский маршрут Донецк – Минск
Металлический маркетплейс