Scrapbooking stickers make wonderful embellishments for handmade cards. You can simply mat them and make them a central feature on your card or you can combine them with other elements to create your own unique embellishment.
Click Here To View Our Scrapbooking Stickers
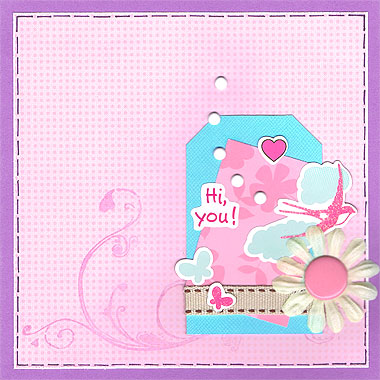
This week I set myself another challenge – to combine scrapbooking stickers with other elements like brads and ribbon to create a sophisticated and stylish embellishment of my own. Here’s what I came up with:

Materials Used: Purple cardstock, Me & My Big Ideas Pink Dot paper, Me & My Big Ideas Pink Floral paper, blue Bazzill cardstock, a purple pen, Basic Grey Swirl stamp, Lilac ink, brown stitched ribbon, one white flower, one large pink brad, five small white brads, ‘Hi You!’ sticker from Suzy’s Zoo and American Crafts Glitter Flower Patch stickers.
To recreate this card making idea using scrapbooking stickers, follow these steps:
1. Cut a piece of purple cardstock measuring 5 1/2 inches by 11 inches (14cm by 28cm). Fold in half to create a card. Place in front of you with the fold down the left side.
2. Cut a piece of Me & My Big Ideas Pink Dot paper measuring 13cm by 13cm.Run the edge of you scissors along the edges to create a white edge and then, using a purple pen, draw a dashed border close to the edges, as shown above. Glue in the centre of your card.
3. Using a swirl stamp and purple ink, stamp a swirly image across the bottom of your card.
4. Cut a tag from blue Bazzill cardstock measuring 5cm by 8cm.
5. Cut a piece of Me & My Big Ideas Pink Floral paper measuring 4cm by 6cm. Glue at an angle to your tag, as shown in the card above.
6. Cut a piece of brown stitched ribbon approximately 7cm long. Wrap it around the base of your tag approximately 0.7cm from the bottom edge.
7. Glue your tag in the bottom right corner of your card approximately 2.1cm from the right edge and 1.8cm from the bottom edge.
8. Place a glittery bird scrapbooking sticker on the right side of your tag, as shown above.
9. Attach five small white brads to create a trail behind your bird sticker, as shown above.
10. Attach a white flower with a large pink brad to the right of your tag and directly below your bird sticker.
11. Place two small butterfly stickers towards the bottom left corner of your tag. One should be on your ribbon and the other just above it, as shown above.
12. Finally, finish off your tag and your card by adding a sentiment (in my case, a ‘Hi You!’ sticker) and a small pink heart sticker.
And there you have it! A unique way to incorporate scrapbooking stickers on your handmade cards and a beautiful card to share with a friend! Try to think out of the box a little and have a go at creating your own unique embellishments with scrapbooking stickers.
Click Here To View Our Scrapbooking Stickers
I’d love to hear what you think of this scrapbooking stickers idea. Please leave a comment in the comments box below.


The supply of the confusion is the GData is a protocol, not a standalone service.