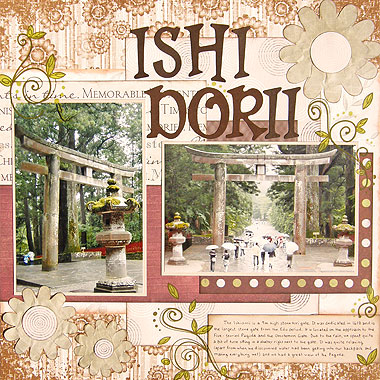
I love scrapbooking ideas that use layering techniques. Layering is a very simple concept, but often can make the difference between a good layout and a great layout. By adding layers, you create a fusion of colours and patterns that give your page texture and depth. In this page, I have used eight different papers and cardstock to create a setting for my photos and embellished with flowers I made myself and rub-ons. As well as creating a stunning page, this is a great technique for using up some of those scraps you have lying around.
This layout was created using Daisy Bucket Designs Bentley Place paper, Paper Pleasure Plus Waldorf Green Lilly Pilly paper, Scrapworks Skinny Diode Poetry paper, Patchwork Chocolate Argyle Plaid paper, Masterpiece Studios Treasured Memories paper, Karen Foster Red Christmas Stripes Paper, Scenic Route
Newport Chestnut Dots Paper, Daisy D’s Khaki paper, dark brown cardstock, light brown cardstock, brown ink, a black pen and Imaginisce Leaves Rub-Ons W/ Rhinestones.
To recreate this scrapbook page idea, follow these steps:
1. Use Daisy Bucket Designs Bentley Place paper as your background.
2. Cut a piece of Paper Pleasure Plus Waldorf Green Lilly Pilly paper measuring approximately 30.5cm by 19.5cm. Ink the edges with brown ink and when dry, glue horizontally to your background about 5.5cm from the bottom.
3. Cut a piece of Scrapworks Skinny Diode Poetry paper measuring approximately 15.5cm by 24.5cm. Ink the edges with brown ink and when dry, glue vertically to your background about 3cm from the bottom edge and 5cm from the right edge.
4. Cut a piece of Patchwork Chocolate Argyle Plaid paper measuring approximately 8cm by 2.5cm. (Please note: Any scrap of dark brown paper will work here). Ink the edges with brown ink and when dry, glue horizontally to your background about 9.5cm from the top edge and 6.7cm from the right edge.
5. Cut a piece of Masterpiece Studios Treasured Memories paper measuring approximately 16.5cm by 9cm. Ink the edges with brown ink and when dry, glue horizontally to your background about 6.5cm from the top edge and up against the left edge.
6. Cut a piece of Karen Foster Red Christmas Stripes Paper measuring approximately 23.5cm by 9.5cm. Ink the edges with brown ink and when dry, glue horizontally to your background about 6.5cm from the bottom edge and up against the left edge.
7. Cut a piece of Scenic Route Newport Chestnut Dots Paper measuring approximately 13.7cm by 11cm. Ink the edges with brown ink and when dry, glue horizontally to your background about 7.2cm from the bottom edge and 0.7cm from the right edge.
8. Mat both your photos (I have used two 4×6 photos) with light brown cardstock.
9. Glue the vertical photo on the left side your page, approximately 1.2cm from the left edge and 7cm from the bottom edge.
10. Glue the horizontal photo on the right side your page, approximately 2cm from the right edge and 8.5cm from the bottom edge.
11. Cut a piece of tan cardstock measuring approximately 13.5cm by 4cm. Use a black pen to write your journaling on this piece. Ink the edges with brown cardstock and when dry, glue to your page approximately 1.5cm from the bottom edge and up against the right edge. Make sure it is just touching the Waldorf Green Lilly Pilly paper – close enough so there is no gap between them but so you can still see the inking on the Waldorf Green Lilly Pilly paper.
12. Cut three different sized flowers from Daisy D’s Khaki paper. Crumple each one up in your hand, being careful not to tear them. When they are crumpled enough, flatten them out again. They should now look nice and worn. Ink the edges with brown ink. Cut out circles from the Scrapworks Skinny Diode Poetry paper and glue one inside each flower to create the flower centre. Glue the largest flower in the top right corner of your page and the other two in the bottom left corner, as seen in the layout above.
13. Cut out your title from dark brown cardstock and arrange above your horizontal photo.
14. Finally, finish off by decorating your page with Imaginisce Leaves Rub-Ons, as shown in the scrapbooking layout above.
What do you think? Do you like this scrapbooking idea? Do you have any questions? Would you have done anything different? We’d love to hear from you! Please leave a comment below.


I have had heaps of fun this evening using papers from my stash to “play” with this layout. I would be very grateful if you could inform me if the papers you used in your layout are available from your shop. I am very keen to create a layout using those delightful papers.
Kindest regards
Pamela
a very pretty LO jenn,great work luv donna xx
I do trust all of the concepts you’ve presented tto your post.
They are very convincing and will certainly work. Nonetheless,
the posts are too quick for novices. May just you please exxtend them a bit from subsequent time?
Thank you for the post.