School plays such a big part in our lives and that of our kids (afterall, most of us are at school for 13 years!) so why not preserve those precious school day memories in your scrapbook albums? Whether it’s photos of your kids in their school uniforms, with their school friends or even nervously walking through the gates on their first day, school stickers are the perfect embellishment to help you record those special moments!
Click Here To View Our Range Of School Stickers
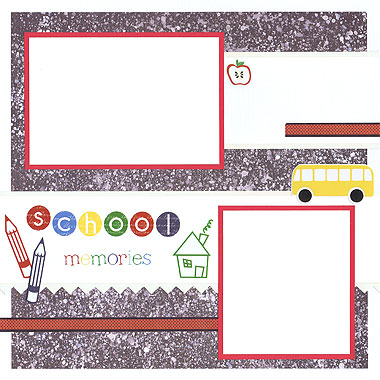
In this layout, I have combined a fun blackboard-like paper, primary colours and Autumn Leaves school stickers to create a cheerful School Memories layout. I have also used a sketch (sketch #220) from my collection of 500 Scrapbooking Sketches to help me with my design.

Materials Used: White Bazzill cardstock, It Takes Two Black paper, red cardstock, light yellow Bazzill cardstock, Hot Off The Press Red border, Autumn Leaves Fun Times At School Stickers and Autumn Leaves Learn At School stickers.
To recreate this scrapbook page idea, follow these steps:
1. Use the White Bazzill cardstock as your background.
2. Cut a piece of black paper measuring 28.5cm by 28.5cm. Glue in the centre of your page.
3. Cut a piece of White Bazzill cardstock measuring 30.5cm by 7cm.
4. Mat your white cardstock from Step #3 with light yellow Bazzill cardstock. However, your white cardstock is already the same width as your page, so you only want to create a yellow edge along the top and bottom.
The top edge should be a thin straight edge, no more than 5mm wide. The bottom edge should be more decorative. I have chosen to cut a zig zag edge approximately 1cm wide for my bottom edge, but you can cut whatever shape you wish.
5. Glue your matted white cardstock across your page approximately 7cm from the bottom edge.
6. Cut another piece of White Bazzill cardstock measuring 13cm by 7cm. Mat with light yellow Bazzill cardstock. But again, you only want a yellow edge approximately 5mm wide along the top and bottom edges.
7. Glue your piece from Step #6 horizontally to your page approximately 4.2cm from the top edge and right up against the right edge.
8. Mat a horizontal 4×6 photo with white Bazzill cardstock and again with red cardstock. Glue to your page approximately 2cm from the right edge and 2.5cm from the top edge. There should not be a gap between it and the piece you glued on in Step #7.
9. Place an apple school sticker in the top left corner of the piece you glued on in Step #7.
10. Cut a piece of Hot Off The Press Red border (or any patterned paper) measuring approximately 7.5cm by 1cm. If you wish, slightly round the top left corner. Glue horizontally to the piece you glued on in Step #7 so that it is right up against the right edge and about 5mm above the bottom white edge of this piece.
11. Add your journaling in the remaining space of the piece you added in Step #7.
12. Cut another piece of Hot Off The Press Red border (or any patterned paper) measuring approximately 18cm by 1cm. Glue horizontally across your page so that it is approximately 4cm from the bottom edge and up against the left edge.
13. Mat a vertical photo (you will need to crop this one down so it isn’t so tall) with white Bazzill cardstock and again with red cardstock. Glue to your page approximately 2cm from the right edge and 1.7cm from the bottom edge.
14. Place a school bus sticker above your photo from Step #13, as shown above. You may wish to mat it on white cardstock first to give it dimension and help it stand out.
15. You should now have a large white section available next to your second photo. Use this space to add your title and extra school stickers.
I have used the stickers ‘School’ and ‘Memories’ to create my title. I have then embellished them with adorable school pencil stickers and a school house sticker. But, your choice of school stickers is completely up to you.
And there you have it. I fun, cheerful layout embellished with school stickers. Perfect for recording those treasured school memories!
Click Here To View Our Range Of School Stickers
I’d love to hear your thoughts and ideas for using school stickers on your layouts. Please leave a comment in the comments box below.


Just great as usual. Good to have you back. Love, Laura
Adorable lay out! Kids could easily follow these steps of course with adult supervision.