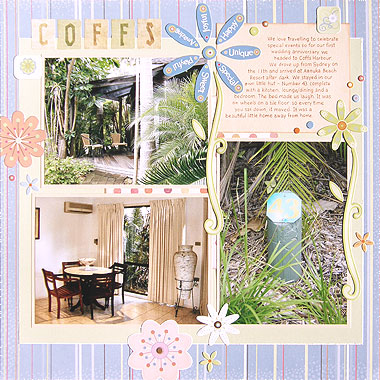
Cloud 9 designs are always fresh and sophisticated. That’s what makes them so much fun to work with. They also co-ordinate really well, so putting together a layout like this is really easy. The photos I have used are from a trip we took to celebrate our first wedding anniversary. We spent a few days relaxing at Coffs Harbour and this is the resort we stayed at. The Cloud 9 designs suited my photos perfectly, but this scrapbooking idea can really be adapted to suit any photos. Have a go yourself and see what you come up with.
This layout was created using Cloud 9 Sorbet Blooms Paper Pack, Scenic Route Sentimental Dots paper, light brown cardstock, brown ink, a brown pen, Creative Imaginations Ocean Alphabet stickers and Cloud 9 Sorbet Villa Thoughts stickers.
Click Here To View Cloud 9 Sorbet Blooms Paper Pack
Click Here To View Creative Imaginations Ocean Alphabet Stickers
Click Here To View Cloud 9 Sorbet Villa Thoughts Stickers
To recreate this scrapbook page idea, follow these steps:
1. Use the blue stripes paper from the Cloud 9 Sorbet Blooms Paper Pack as your background.
2. Cut a piece of green paper from the Cloud 9 Sorbet Blooms Paper Pack measuring approximately 27.5cm by 24.5cm. Run the edge of your scissors along the edges to give a distressed white edge. Glue horizontally to your background approximately 1.5cm from the left edge and 3cm from the bottom edge.
3. Cut a square of Scenic Route Sentimental Dots paper measuring approximately 14cm by 14cm. Ink the edges with brown ink and when dry, glue to the centre of your page.
4. Mat two horizontal 4×6 photos (you may like to crop them a little) and one vertical 4×6 photo with light brown cardstock.
5. Glue your vertical photo in the bottom right corner of your page, approximately 2.5cm from the right edge and 4.2cm from the bottom edge.
6. Glue a horizontal photo next to your vertical photo so that the bottom edge is inline with the bottom edge of your vertical photo.
7. Glue your second horizontal photo above your first.
8. Cut a piece of light brown cardstock measuring approximately 10.7cm by 8.8cm. Ink the edges with brown ink and when dry, glue above your vertical photo. Add your journaling with a brown pen, but be careful – you will be covering significant areas of this piece with stickers later.
9. Place a tab sticker from Cloud 9 Sorbet Villa Thoughts stickers in the top right corner of your journaling piece, as shown above. Place another one near the top left corner of your top horizontal photo, as shown above.
10. Place the blue flower stickers at the top of your page in the centre, as shown above. Place the green stem sticker and leaf sticker below them. They will all overlap other elements on your page, so make sure you are not covering anything important.
11. Place the second green stem sticker down the right side of your vertical photo and the green flower sticker at the top of it. Add the leaf sticker and small orange sticker, as shown above.
12. Add a collection of small circular stickers around your journaling block for extra decoration.
13. Cut out an orange flower from the Green Flowers paper from the Cloud 9 Sorbet Blooms Paper Pack. Glue on the left side of your page, as shown above. Place a small green dot sticker at the centre of your flower. Then place the small blue flower sticker and another dot sticker below it, as shown above.
14. Cut out a pink flower and a white flower from the Green Flowers paper from the Cloud 9 Sorbet Blooms Paper Pack. Glue at the bottom of your page, as shown above. Place a brown dot sticker in the centre of each flower and a small green flower sticker next to them, as shown above.
15. Finally, using letters from Creative Imaginations Ocean Alphabet stickers, place your title in the top left corner of your page.
What do you think? Do you like this Cloud 9 scrapbooking idea? Do you have any questions? Would you have done anything different? We’d love to hear from you! Please leave a comment below.


