Often when we go looking for fresh scrapbooking ideas, what we find is often difficult and time consuming to re-create. But sometimes, the real beauty in a layout lies in its simplicity!
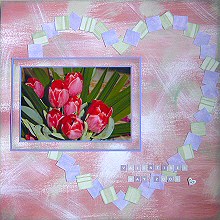
For example, the scrapbooking layout below involves little more than matting your photo and scattering some small squares of patterned paper around your page. But in using these squares to create a heart-shaped frame around your photo, you can create a gorgeous page to preserve a special photo.
Click Here To View Our Full Range Of Scrapbooking Papers

Materials Used: Pixie Press Rose Splash paper, Creative Imaginations Lavender Wash paper, Me & My Big Ideas Green Stripe paper, purple cardstock, green ink, All My Memories Alphabet stickers and Queen & Company Purple Heart Brads.
To recreate this heart scrapbooking idea, follow these steps:
1. Use the Rose Splash paper as your background. Lightly ink around the edges with green ink. The effect is subtle, but it does help to bring out the green in the paper’s design. Set aside to dry.
2. Mat a 4×6 horizontal photo with purple cardstock. The border around your photo should be quite small (around 2mm).
3. Mat your photo again with Rose Splash paper. This border should be much wider (around 10mm). Ink the edges with green ink.
4. When dry, once again mat your photo with purple cardstock. This border should also be narrow (around 2mm).
5. Place your matted photo on your background paper to decide its position, but do not adhere yet. If you wish, you can lightly mark where it will go with a pencil.
6. Cut out (or punch) a collection of 2cm squares from both your Creative Imaginations Lavender Wash paper and your Me & My Big Ideas Green Stripe paper. You will need 35-40 squares in total.
7. Ink the edges of your green squares with green ink and set aside to dry.
8. And now comes the creation of your heart scrapbooking idea! Arrange your squares in a heart shape around where your photo will go, as shown in the layout above. Make sure you use and variety of angles and keep in mind that you do not have to alternate your squares evenly all the way around your heart. In other words, it does not have to go purple, green, purple, green, purple, green etc. Doubling up on one or the other colours every now and then helps to add interest to your page.
9. Once you have completed you heart, adhere your photo in place.
10. Use your alphabet stickers to write your title towards the bottom right corner of your scrapbooking layout. Remember, keeping it small and understated draws the viewer’s attention to your photo and the heart frame you have created around it.
11. Finally, finish off your page with a simple heart accent like a Purple Queen & Company Heart Brad in the bottom right corner of your page, next to your title.
The beauty of this heart background scrapbooking idea is that it really doesn’t matter what scrapbooking supplies you have. You can adapt it to suit any papers you like!
Click Here To View Our Full Range Of Scrapbooking Papers
I’d love to hear what you think about using heart scrapbooking ideas like this and whether or not you give this one a go. Please leave a comment in the comments box below.


A simply but very effective page. Very classy.
i absolutely love this page… cant wait to do it with a photo of my baby boy… its going to look so cool… thankyou so much