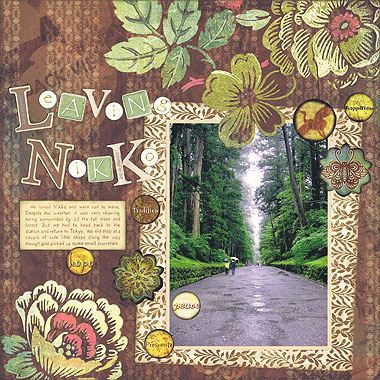
Creative Imaginations stickers are a high quality range of stickers with spectacular designs. I love working with them. Not only are the designs amazing, but you really feel like you are working with a high-end, sophisticated product. Match them with a great photo and some stylish paper and it’s easy to create a winning design. Here’s one I came up with.
Click Here To View Our Range Of Creative Imaginations Stickers

This layout was created using Basic Grey Fitting At Penny’s paper, 7Gypsies Boulogne paper, light brown cardstock, dark brown ink, black ink, a brown pen, alphabet stickers (I have used a combination of letters from Pebbles Inc, Hot Off The Press and Paper House) and Creative Imaginations Asian Fusion stickers.
To recreate this scrapbook page idea, follow these steps:
1. Use the Basic Grey Fitting At Penny’s paper as your background. Ink the edges with dark brown ink and set aside to dry.
2. Cut a piece of 7Gypsies Boulogne paper measuring 17.5cm by 21cm. Ink the edges with dark brown ink. If you wish, you can also smudge the ink all across your paper as I have done. When dry, place towards the bottom right corner of your page at an angle, as shown above, but do NOT glue in place.
3. Take note of the section of the green flower at the top of your background that is being covered up by your Boulogne paper. Set your Boulogne paper aside. Using a craft knife, carefully cut around the outline of the section of flower that was covered, just enough so you can slide your Boulogne paper underneath it. Please note: you are not cutting out the whole flower – just part of the edge, as shown in the scrapbooking layout above.
4. Glue your Boulogne paper in place, making sure you slide it under the flower edge you have cut. Do NOT glue down the flower.
5. Mat a vertical 5×7 photo with light brown cardstock. Glue in the centre of your Boulogne paper, making sure to slide the top underneath your green flower. Make sure your photo is straight and is about 2.4cm from the bottom edge.
6. Glue down the edge of your flower so it doesn’t catch on anything.
7. Select a collection of letters you want to use to make up your title. I have mixed and matched different colours, sizes and shapes for a unique title. Lightly ink the edges of each letter with black ink. This is not essential but helps to tie them in the Creative Imaginations Asian Fusion stickers you are about to use. When the ink is dry, create your title towards the top left corner of your page, as shown in the scrapbooking layout above.
8. Cut a piece of light brown cardstock measuring approximately 8.5cm by 4cm. Using a brown pen, add your journaling. Ink around the edges with dark brown ink and then very lightly with black ink. When dry, glue underneath your title.
9. Select your crane sticker, butterfly sticker and a small circle sticker from Creative Imaginations Asian Fusion stickers and arrange in the top right corner of your photo.
10. Finally, select four more small circle stickers and an ornamental sticker from Creative Imaginations Asian Fusion stickers and arrange towards the bottom left corner of your page, as shown in the scrapbooking layout above.
What do you think? Do you like this scrapbooking idea using Creative Imaginations stickers? Do you have any questions? Would you have done anything different? We’d love to hear from you! Please leave a comment below.


[...] Via: stickersnfun [...]