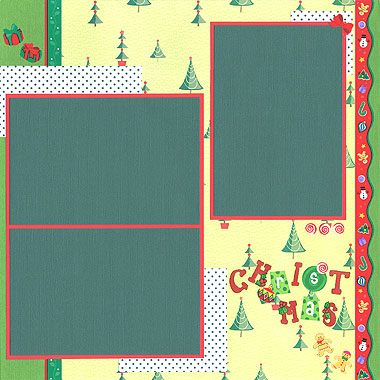
Christmas scrapbooking stickers are quick and easy to use and look absolutely fabulous on your scrapbooking layouts. In this layout, I have used some fun Christmas border stickers to dress up my page and capture the spirit of Christmas.
Click Here To View Our Christmas Stickers

Materials Used: Textured green cardstock, American Traditional Christmas Trees paper, Green Polka Dot paper, red cardstock, dark green textured cardstock, alphabet stickers from Sandylion and Creative Imaginations and Sandylion Christmas Icons Borders stickers.
To recreate this scrapbooking idea using Christmas scrapbooking stickers, follow these steps:
1. Use a textured green cardstock as your background.
2. Cut a piece of American Traditional Christmas Trees paper approximately 23.5cm wide. Glue down your page approximately 2cm from the right edge.
3. Place your Christmas border sticker with the wavy edge down the right side of your Christmas tree paper from Step #2, as shown in the Christmas scrapbooking idea above.
4. Place your other Christmas border sticker down the left side of your Christmas tree paper from Step #2, as shown in the Christmas scrapbooking idea above.
5. Cut a piece of Green Polka Dot paper measuring approximately 11.5 by 5.8cm. Glue up against the left edge of your page approximately 5.3cm from the top edge.
6. Cut a second piece of Green Polka Dot paper, this time measuring approximately 9.7cm by 8.3cm. Glue towards the bottom of your page approximately 0.7cm from the bottom edge and 9.5cm from the left edge.
7. Cut a third piece of Green Polka Dot paper, this time measuring approximately 5cm by 5cm. Glue towards the top right corner of your page approximately 1cm from the top edge and 2.2cm from the right edge.
8. Mat a vertical 4×6 photo with dark green textured cardstock and again with red cardstock. Glue towards the top right corner of your page. It should look like the Green Polka Dot paper is peeping out from underneath the top right corner of your photo, as shown in the layout above.
9. Mat two horizontal 4×6 photos with dark green textured cardstock. Mat them again with a single mat of red cardstock. Glue towards the bottom left corner of your page, as shown above. Again, it should appear as though the Green Polka Dot paper is peeping out from underneath your photos.
10. Using alphabet stickers, stamps or rub-ons, write your title in the bottom right corner of your page.
11. Finally, scatter your remaining Christmas stickers around your page to top it off.
No matter how you celebrate Christmas, it’s always a special time of year. Make sure you capture those precious moments with your camera to include in your scrapbooks. Then scatter in some Christmas scrapbooking stickers and you’ll have an album the whole family will treasure for years to come.
Click Here To View Our Christmas Stickers
I’d love to hear what you think of this Christmas scrapbooking stickers idea. Please leave a comment in the comments box below.


this one is one of the better ones i have seen. most of them are to busy for my taste. i like the pattern paper background with the plain mattes. also, i think i will be taking the dotted paper out, otherwise it is great.
i will use it to do some camping photos changing the patterned paper to a camp fire one, and using browns for the mattes.
given time, i could come up with other ideas for some of my photos.\
thanks for the idea.
The samples, reflections and ther contents allow or invite others to obnserve and celebrate students’ progress and accomplishments.