Wow! Our exclusive Christmas Magic Cut-Outs (free with any order over $60 during our birthday sale) have literally been walking out the door. I haven’t counted how many of you have snapped them up yet, but I seem to be packing them with parcel after parcel.
So, since so many of you have them on the way to your door, I thought I would share a few ideas on how you might use them. Here are three quick Christmas cards you can make with Christmas Magic Cut-Outs.


If you haven’t got your free set of Christmas Magic Cut-Outs yet, you still have until midnight on Wednesday 10th December, 2008. Just place an order over $60 (not including postage) and we will send you your free set. But be quick – once our birthday sale is over, they will be gone forever.
Click Here To Start Shopping Now
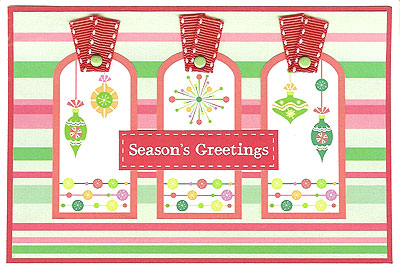
Christmas Magic Card Idea 1: Seasons Greetings

This card was created using white Bazzill cardstock, Doodlebug Christmas Stripe paper, red cardstock, red ribbon, three green brads, a ‘Seasons Greetings’ message from Simply Cards magazine and Stickers ‘N’ Fun exclusive Christmas Magic Cut-Outs.
To recreate this card making idea, follow these steps:
1. Cut a piece of white Bazzill cardstock measuring 15cm by 20.6cm. Fold in half to create a card.
2. Turn your card so the fold is along the top.
3. Cut a piece of Doodlebug Christmas Stripe paper measuring 14cm by 9.3cm. Mat with red cardstock and glue to the centre of your card.
4. Cut out the three Christmas Magic tags and glue them side by side across the centre of your card, as shown above.
5. Cut three small pieces of red ribbon. Fold each piece in half and secure to the top of one of your tags with a green brad, as shown above.
6. Finally, glue your ‘Seasons Greetings’ message across the centre of your tags.
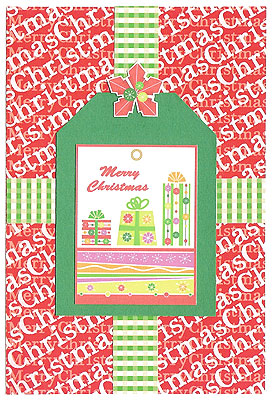
Christmas Magic Card Idea 2: Merry Christmas

This card was created using white Bazzill cardstock, Simply Cards Magazine Red Christmas paper, Simply Cards Magazine Green Plaid paper, green cardstock and Stickers ‘N’ Fun exclusive Christmas Magic Cut-Outs.
To recreate this card making idea, follow these steps:
1. Cut a piece of white Bazzill cardstock measuring 15cm by 20.6cm. Fold in half to create a card.
2. Turn your card so the fold is down the left side.
3. Cut a piece of Simply Cards Magazine Red Christmas paper measuring 9.7cm by 14.4cm and glue to the centre of your card.
4. Cut a piece of Simply Cards Magazine Green Plaid paper measuring 1.7cm by 14.4cm and glue vertically down the centre of your card.
5. Cut a piece of Simply Cards Magazine Green Plaid paper measuring 9.7cm by 1.7cm and glue horizontally across the centre of your card.
6. Cut a tag measuring approximately 6cm by 8.3cm from green cardstock and glue to the centre of your card.
7. Cut out a Merry Christmas rectangle from Christmas Magic Cut-Outs and glue towards the bottom of your green tag, as shown above.
8. Finally, cut out a red holly from Christmas Magic Cut-Outs and glue at the top of your tag, as shown above.
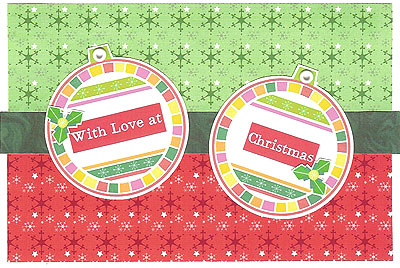
Christmas Magic Card Idea 3: With Love At Christmas

This card was created using white Bazzill cardstock, Simply Cards Magazine Red Snowflakes paper, Simply Cards Magazine Green Snowflakes paper, Hot Off The Press Green Suede paper, two white eyelets, a ‘With Love At Christmas’ message from Simply Cards Magazine and Stickers ‘N’ Fun exclusive Christmas Magic Cut-Outs.
To recreate this card making idea, follow these steps:
1. Cut a piece of white Bazzill cardstock measuring 15cm by 20.6cm. Fold in half to create a card.
2. Turn your card so the fold is along the top.
3. Cut a piece of Simply Cards Magazine Red Snowflakes paper measuring 14.4cm by 4.5cm. Glue horizontally across the bottom of your card, leaving a small white border all the way around.
4. Cut a piece of Simply Cards Magazine Green Snowflakes paper measuring 14.4cm by 4.5cm. Glue horizontally across the top of your card, leaving a small white border all the way around.
5. Cut a piece of Hot Off The Press Green Suede paper measuring 15cm by 1.6cm. Glue horizontally across the centre of your card so that it covers the bottom edge of your Green Snowflake paper and the top edge of your Red Snowflake paper.
6. Cut out two ornaments from Christmas Magic Cut-Outs. Glue them side by side and at angles in the centre of your card, as shown above.
7. Attach a white eyelet at the top of each Christmas Magic ornament from the previous step.
8. Place your ‘With Love At’ message in the centre of the ornament on the left and your ‘Christmas’ message in the centre of the ornament on the right.
9. Finally, embellish each ornament with a small green holly, as shown above.
What do you think? Do you like these Christmas Magic card ideas?
Don’t forget you can still get your free set of Christmas Magic Cut-Outs. Just place an order over $60 (not including postage) during our birthday sale – where EVERYTHING is reduced – and we will send you a set for free.
But be quick, you only have until midnight on Wednesday 10th December, 2008 and then they will be gone forever.


I love the news letters and spend ages going through the list of things at the side Have made a few of your cards love these ones Thank you so much Have a Merry Christmas and a Happy New Year Cheers Ruth