With Christmas coming so fast, I thought it was a great time to put together some Christmas cards ideas for you and our new 3D Sandylion stickers provided just the inspiration I needed. They are the perfect embellishment for your special handmade cards. They literally pop out from your card calling ‘Look At Me…I’m so cute!’ Plus, you can create multiple cards with just one sheet of stickers.
For example, the following three cards were made using Sandylion 3D Christmas Reindeer stickers and I still have stickers left over to make more.
Click Here To View Our Complete Range of Christmas Stickers


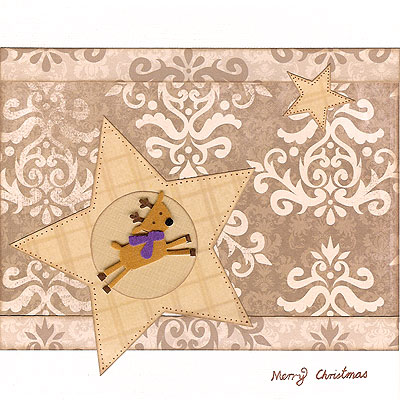
Christmas Card Idea 1: Stars

This card was created using white Bazzill cardstock, Kaisercraft Hazelnut paper, Provo Craft By The Seashore paper, brown cardstock, brown ink, a brown pen and Sandylion 3D Christmas Reindeer stickers.
To recreate this card making idea, follow these steps:
1. Cut a piece of white Bazzill cardstock measuring 5 1/2 inches by 11 inches (14cm by 28cm). Fold in half to create a card.
2. Turn your card so the fold is down the left side.
3. Cut a piece from the underside of Kaisercraft Hazelnut paper measuring 14cm by 9cm. Ink the left and right edges with brown ink. When dry, glue across the centre of your card.
4. Cut two pieces of Kaisercraft Hazelnut paper each measuring approximately 14cms by 1.2cm. Ink all the way around the edges of both pieces with brown ink. When dry, glue the first piece across your card so it covers the top edge of your brown paper from Step #3, as shown above. Glue the second piece across your card so it covers the bottom edge of your brown paper from Step #3.
5. Cut a large star shape from Provo Craft By The Seashore paper. It should be approximately 9cm across. Ink the edges with brown ink. When dry, use a brown pen to draw a dotted border around the edges. Glue at an angle in the bottom left corner of your card.
6. Cut a small star shape from Provo Craft By The Seashore paper. It should be approximately 2.5cm across. Ink the edges with brown ink. When dry, use a brown pen to draw a dotted border around the edges. Glue at an angle in the top right corner of your card.
7. Cut out a circle from brown cardstock. It should be approximately 3.8cm in diameter. Ink the edges with brown ink and when dry, glue in the centre of your large star.
8. Place your 3D Reindeer sticker in the centre of your circle from the previous step.
9. Finally, using a brown pen, write your Christmas message in the bottom right corner of your card.
Click Here To View Our Complete Range of Christmas Stickers
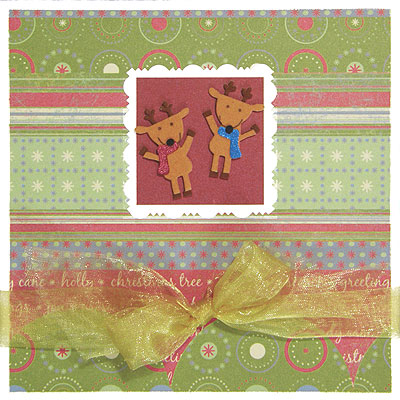
Christmas Card Idea 2: Reindeer Friends

This card was created using white Bazzill cardstock, Kaisercraft Christmas Wish paper, Kaisercraft Let It Snow paper, decorative edge scissors, gold organza ribbon and Sandylion 3D Christmas Reindeer stickers.
To recreate this card making idea, follow these steps:
1. Cut a piece of white Bazzill cardstock measuring 5 1/2 inches by 11 inches (14cm by 28cm). Fold in half to create a card.
2. Turn your card so the fold is along the top.
3. Cut a piece of Kaisercraft Christmas Wish paper measuring 13.3cm by 13.3cm. Run the edge of your scissors along each edge to give a distressed look and glue to the centre of your card.
4. Cut a square from the underside of Kaisercraft Let It Snow paper measuring approximately 4.5cm by 4.5cm. Mat with white Bazzill cardstock. Using a pair of decorative edge scissors, cut a fancy edge all the way around your white Bazzill cardstock, as shown above. Glue to the centre of your card approximately 2.5cm from the top edge
5. Place two 3D Reindeer stickers in the centre of your square from the previous step.
6. Finally, tie a gold organza ribbon around your card approximately 2.5cm from the bottom edge.
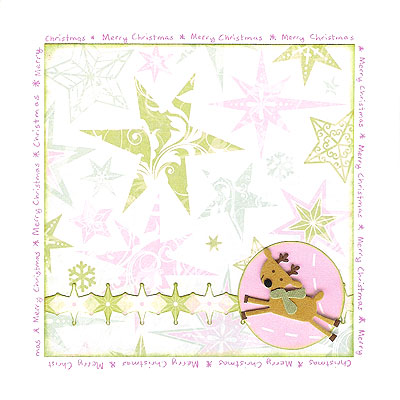
Christmas Card Idea 3: Star Bright

This card was created using white Bazzill cardstock, Kaisercraft Star Bright paper, a scrap of pink paper from Urban Lily, green ink, a pink pen and Sandylion 3D Christmas Reindeer stickers.
To recreate this card making idea, follow these steps:
1. Cut a piece of white Bazzill cardstock measuring 5 1/2 inches by 11 inches (14cm by 28cm). Fold in half to create a card.
2. Turn your card so the fold is down the left side.
3. Cut a piece of Kaisercraft Star Bright paper measuring 10.8cm by 10.8cm. Ink around the edges with green ink. When dry, glue in the centre of your card.
4. Using a pink pen, write ‘Merry Christmas’ repeatedly all the way around the edges of your Star Bright paper, as shown above, to create a border.
5. Cut a strip from the underside of Kaisercraft Star Bright paper measuring approximately 10.8cm by 1.5cm. If you are good with fine work, cut this strip to the shape of the diamonds, as shown above. Otherwise, just use as is. Ink the edges with green ink and when dry, glue across your Star Bright paper from Step #3 approximately 1cm above the bottom edge.
6. Cut out a pink circle approximately 3.7cm in diameter. Ink the edges with green ink. When dry, glue in the bottom right corner of your Star Bright paper, as shown above.
7. Finally, place your 3D Reindeer sticker in the centre of your circle from the previous step.
Click Here To View Our Complete Range of Christmas Stickers
What do you think? Do you like this Christmas cards ideas? Do you have any questions? Would you have done anything different? We’d love to hear from you! Please leave a comment below.


Thanks for the great ideas, as l am making my own christmas cards this year also. hope the painting is over before christmas day.
our family always have christmas day at my house because it is bigger has air con and a pool plus there are over 35 of us on the day and more babies joining next year.
Cute cards Jen
Thanks Jen,Great card ideas for me to think about.Hope your painting goes well I’m thinking about doing my room.
The new wall will show up beautifully in yor photos. Ilove your ideas and use as many as possible as my imagination is alittle slow. I usually have 30 people for Christmas lunch but last year at the table announced my family were going on a cruise next Christmas and who wanted to come also. We had a couple of takers so this year I am looking forward to being waited on. I wish you and your family a safe and happy Christmas.
This is wonderful! a great help and partner for original arts lovers.
Thanks a lot!
Nimfa
Japan
This is great! Thanks and more power….
Nimfa Yahaba
Japan
This is so awesome…i’m using these cards for my Design and tech project! Thanks so much for your help…one question…where do you get all of this equipment from…PLEASE REPLY!!!!
Cute, and as usual, brilliant, just great.Love,Laura
Excellent article! We are linking to this great
article on our website. Keep up the good writing.
It is actually a classic nice and practical part of details. I am fulfilled that you simply distributed this handy info about. Remember to stay people up-to-date this way. Appreciate your discussing. It is actually a classic nice and practical part of details. I am fulfilled that you simply distributed this handy info about. Remember to stay people up-to-date this way. Appreciate your discussing.
Unquestionably believe that that you said. Your favourite justification appeared
to be at the internet the easiest factor to remember of.
I say to you, I certainly get annoyed whilst other folks consider issues that they just do not realize about.
You managed to hit the nail upon the top and defined out the whole thing with no need side
effect , people can take a signal. Will probably be again to get more.
Thanks
Howdy! This is my first comment here so I just wanted to give a quick shout out and tell you I
really enjoy reading through your blog posts.
Can you recommend any other blogs/websites/forums that go
over the same subjects? Appreciate it!