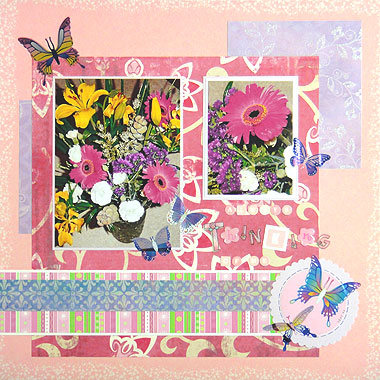
You’ve probably noticed by now that I adore butterflies and I incorporate them into my scrapbooking layouts as much as possible. And the Sticko range from EK Success has some of the best butterfly scrapbooking stickers around! For this layout, I have chosen their Metallic Butterfly Stickers for their gorgeous colours and their pretty reflective appearance.
Click Here To View Our Sticko Stickers

Materials Used: Cloud 9 Pink Hearts paper, American Traditional Glitter paper, My Minds Eye Quite Smitten Surprise Bouquet paper, Autumn Leaves Paper Ribbon paper, Karen Foster Purple Houndstooth paper, white cardstock, light purple cardstock, pink cardstock, a purple pen, random pink alphabet stickers and Sticko Metallic Butterflies stickers.
To recreate this scrapbooking idea using butterfly scrapbooking stickers, follow these steps:
1. Use the Cloud 9 Pink Hearts paper as your background.
2. Cut a piece of American Traditional Glitter paper measuring approximately 10.7cm by 11.8cm. Glue vertically in the top right corner of your page approximately 1.5cm from the right edge and 1.7cm from the top edge.
3. Cut a second piece of American Traditional Glitter paper, this time measuring approximately 2cm by 10.5cm. Glue vertically on the left side of your page approximately 1.5cm from the left edge and 8cm from the top edge.
4. Cut a piece of My Minds Eye Quite Smitten Surprise Bouquet paper measuring approximately 23cm by 2.4cm. Glue towards the bottom left corner of your page approximately 2.5cm from the left edge and 1.9cm from the bottom edge.
5. Cut a piece of Autumn Leaves Paper Ribbon paper measuring approximately 25 by 4.8cm. Mat with white cardstock and glue across the bottom of your page approximately 3.6cm from the bottom edge. The left edge should be up against the left edge of your paper, as shown in the scrapbooking idea above.
6. Cut a piece of Karen Foster Purple Houndstooth paper measuring approximately 25cm by 2.4cm. Glue across your Paper Ribbon paper from step #5 approximately 0.6cm below the top edge of your Paper Ribbon paper.
7. Mat a vertical 4×6 photo with light purple cardstock. Glue to your page approximately 4.2cm from the left edge and 3.2cm from the top edge. You will find it sits nicely in the top left corner of your pink paper.
8. Mat a smaller vertical photo with white cardstock and again with light purple cardstock. Glue next to your first photo. It should sits nicely in the top right corner of your pink paper, as shown above.
9. Use a random collection of pink alphabet stickers to write your title in the space underneath your small photo.
10. Cut a circle from pink cardstock. It should be about 5.3cm in diameter. Using a purple pen, draw a dotted border around the edge.
NOTE: If you want to conceal a small detail, like a date, include it in your dotted circle as I have done.
11. Mat your pink circle with light purple cardstock. You can use a plain or decorative-edged circle. For added effect, add a dashed border as well!
12. Glue your circle towards the bottom right corner of your page. I positioned mine as if it was at the end of my Paper Ribbons paper, but the exact positioning is up to you. When in place, add two metallic butterfly scrapbooking stickers, as shown above.
13. Finally, add 3 or 4 extra metallic butterfly stickers around your page.
Butterflies make stunning embellishments for your scrapbooking layouts. And they are so versatile! I have used them in combination with my flower photos, but they work beautifully with photos of weddings, anything with girls, romance, vacations and much more.
Click Here To View Our Sticko Stickers
I’d love to hear what you think of this butterfly scrapbooking stickers idea? Please leave a comment in the comments box below.


V súčasnej dobe je Zdá ako Drupal je najlepšie blogovanie platformy tam vonku práve teraz.
(Z toho, čo som čítal), je to, čo ste používate na svojom blogu?