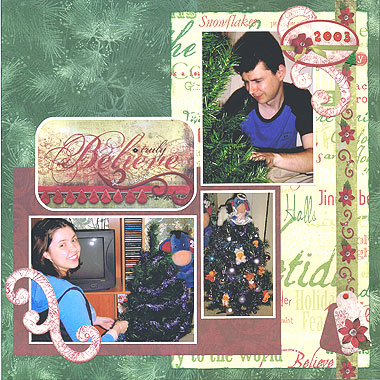
Bo Bunny stickers give a unique and sophisticated sense of dimension to your scrapbooking layouts without being bulky. They are made from adhesive cardstock so they are strong and can be placed on uneven backgrounds (liked layered papers) with ease. You can use them as they are, or dress them up a little as I have done in the scrapbooking idea below.
Click Here To View Our Range Of Bo Bunny Stickers

This layout was created using Paper Adventures Evergreen Dream paper, Flair Holiday Words paper, Bo Bunny Holiday Heirloom Floral paper, white cardstock, green ink, red alphabet stickers, one red brad, one silver brad, one Christmas tree brad and Bo Bunny Truly Believe In Christmas stickers.
To recreate this scrapbook page idea, follow these steps:
1. Use the Paper Adventures Evergreen Dream paper as your background. Ink the edges with green ink and set aside to dry.
2. Cut a piece of Flair Holiday Words paper measuring 16cm by 28.5cm. Ink the edges with green ink and when dry, glue vertically to your layout approximately 1cm from the top edge and 1cm from the right edge.
3. Stick your Bo Bunny border sticker from Bo Bunny Truly Believe In Christmas stickers down the right side of your page, about 2cm from the right edge.
4. Cut a piece of Bo Bunny Holiday Heirloom Floral paper measuring 21.5cm by 15cm. Glue horizontally to your layout approximately 1cm from the left edge and 2cm from the bottom edge.
5. Crop a vertical 4×6 photo down to approximately 8.8cm by 12cm. Mat with white cardstock and glue towards the top right corner of your page approximately 5.2cm from the right edge and 2.4cm from the top edge.
6. Crop a second photo so you have a vertical photo measuring approximately 5.5cm by 9.8cm. Mat with white cardstock. Glue to your page so that the left edge is inline with the left edge of the previous photo. See layout above for exact layout.
7. Crop a horizontally 4×6 photo down to approximately 13cm by 9.8cm. Mat with white cardstock and glue towards the bottom left corner of your page approximately 2.2cm from the left edge and 2.9cm from the bottom edge.
8. Mat your ‘Truly Believe’ sticker from your Bo Bunny stickers with white cardstock. Glue above your horizontal photo, as shown in the layout above.
9. Give your Bo Bunny stickers an extra touch of dimension by placing a silver brad over the dot in the ‘i’ of your ‘Truly Believe’ sticker.
10. Take your two flourish stickers. Place one towards the bottom left corner of your page and the other towards the top right corner, as shown in the scrapbooking page above. They should both overlap your photos.
11. Place your oval shaped Bo Bunny sticker in the top right corner of your page so that it overlaps your swirl sticker, your photo and your border sticker. Use red alphabet stickers to write the date or a small caption on top of this sticker.
12. Place a small Christmas tree brad towards the bottom right of your oval sticker from the previous step, again for added dimension.
13. Cut out a piece of Bo Bunny Holiday Heirloom Floral paper the same size and shape of the small Christmas tag sticker. Place both your cut out tag and your tag sticker in the bottom right corner of your page, as shown above, and stick in place.
14. Finally, place a red brad towards the top of your tag Bo Bunny sticker from the previous step.
What do you think? Do you like this scrapbooking idea using Bo Bunny stickers? Do you have any questions? Would you have done anything different? We’d love to hear from you! Please leave a comment below.


