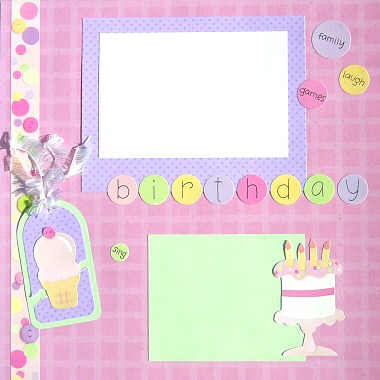
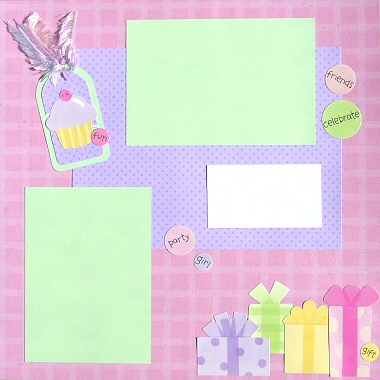
Creating handmade tags are a great way to dress up both your birthday girl stickers and your scrapbooking page. In this double-page layout we look at how to effectively combine using stickers directly on your page with dressing up your stickers with tags.
Click Here To View Our Full Range Of Birthday Stickers


Materials Used: Paper Garden Watermelon Plaid paper, Beary Patch Grapebeary Dot paper, green cardstock, white cardstock, pastel eyelash ribbon and Doodlebug Birthday Girl stickers.
To recreate this scrapbooking idea, follow these steps:
1. Use the Paper Garden Watermelon Plaid paper as your background for both pages
2. Place your border sticker down the left side of your left-hand page
3. Mat a horizontal 4×6 photo with white cardstock. This should be your primary photo. Mat again with Grapebeary Dot paper. Leave a little extra room under the photo as this is where your title will eventually go. Glue to your left page so that it is centred horizontally and is positioned towards the top edge of your page
3. Mat a second horizontal with green cardstock. Glue it towards the bottom right corner of your left page, making sure you leave plenty of room to add a birthday cake sticker later.
4. Cut another piece of Grapebeary Dot paper and glue towards the top right corner of your page, as shown in the layout above.
This will add structure to your layout and draw the different elements together. It also creates a nice balance with the purple dot mat on the left page.
5. Mat your remaining photos (one vertical, one horizontal) with green cardstock and position on your right page as shown above.
6. Cut out a journaling box from white cardstock. Add your journaling and glue on your right page below your vertical photo.
7. Before you begin decorating your layout with birthday girl stickers, construct two tags. For each tag, cut a tag shape out of green cardstock. Cut a smaller version from purple dot paper and tear it into two pieces. Glue the two pieces to your green tag so that there is a thin strip between them. Place your birthday sticker on top. Finally, punch a hole in the top of the tag and thread your eyelash fibre through.
8. Place your ice-cream sticker tag on the left page and your cupcake sticker tag on the right page, as shown above.
9. Decorate the rest of your layout with your remaining birthday girl stickers. For a fun effect, layer your gift stickers on top of each other in the bottom right corner to create a pile of presents.
When you are done you will have a bright cheerful layout to reflect the joy of a birthday celebration. The circular birthday stickers carefully arranged on your page also help create the party atmosphere.
Click Here To View Our Full Range Of Birthday Stickers
I’d love to hear what you think about this birthday girl stickers scrapbooking idea. Please leave a comment in the comments box below.


