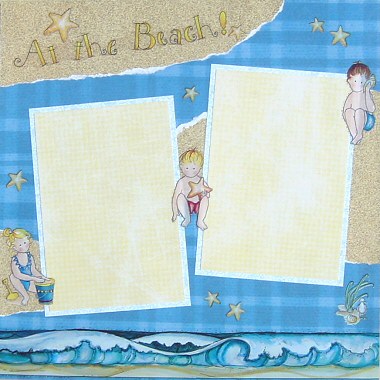
The successful combination of beach scrapbooking stickers and co-ordinating patterned papers is central to the effectiveness of this layout. However, even with the most perfect combinations, a page can sometimes feel flat and dull. To alleviate this, I have used an easy paper tearing technique that adds depth to my page and gives it an interesting texture.
This layout was created using Daisy D’s Snow Plaid Winter Blue paper, Sandylion Travel Sand paper, Renae Lindgren Light Blue Squiggles paper, Daisy D’s Buttercream Gingham paper and Bo Bunny At The Beach stickers.
To recreate this scrapbook page idea, follow these steps:
1. Use the Daisy D’s Snow Plaid Winter Blue paper as your background. If you do not have this paper, any ocean blue paper will do. Use the beach border sticker as your guide for finding the right shade of blue.
2. Adhere your beach border sticker along the bottom edge of your page.
3. Take your Sandylion Travel Sand paper (or a similar design) and tear three ‘mounds.’ The first is for the top left-hand corner. It should be quite long and narrow, like in the layout above. The second is for the middle of your page on the right. It should be more than 6 inches long and reasonably fat. The third is for the bottom left and should be significantly smaller than the others. See the layout above for a clearer indication of size and shape.
PLEASE NOTE: To obtain a white edge around your sand paper when tearing, tear the paper slowly towards you.
4. Glue your ‘sand mounds’ in place.
5. Mat your photos with Daisy D’s Buttercream Gingham paper (or another light yellow paper). Mat again with Renae Lindgren Light Blue Squiggles paper (or another light blue paper).
6. Glue your photos to your page at an angle, as shown in the layout above.
7. Place the sticker of the girl in the bottom left corner of your left photo so that she is sitting on the mound of sand.
8. Place the sticker of the boy with a shell to his ear in the top right corner of the right photo, also so he is sitting on a mound of sand.
9. Place the sticker of the boy with the starfish in the centre of the page, creating a diagonal line between the other two children. This brings a sense of unity to the page.
10. Place the title sticker across the top sand mound. Decorate with a large starfish sticker.
11. Finally, decorate the rest of your page with the remaining beach scrapbooking stickers. Pay attention to where you place them – they can make or break your page. Try to create a balanced feel to your page.
What do you think? Do you like this beach scrapbooking idea? Do you have any questions? Would you have done anything different? We’d love to hear from you! Please leave a comment below.


I’ve been having a hard time getting motivated to scrap lately, but this layout may just be what I needed. Thanks for a great job!
Thanks Rita. I’m glad you liked the idea. I hope you had a lot of fun making your page.
Hi there it’s me, I am also visiting this web site daily, this
web site is really pleasant and the viewers are genuinely sharing good thoughts.
Thanks for every other informative blog. Where else could I get that kind of information written in such a perfect manner?
I have a mission that I am just now running on, and I’ve been on the look out
for such information.
Very nice blog post. I certainly appreciate this
website. Thanks!
Contamos asimismo con un equipo de iluminación profesional Hensel y Profoto que
garantiza la mayor calidad de cada fotografía.
Thanks for finally talking about > Beach Scrapbooking Stickers < Loved it!
He didn’t have fun with OP, like all of us, is sad because it looks more like he’s laughing as a defence