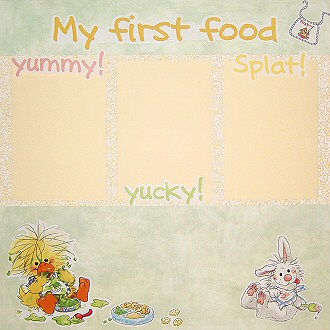
The first couple of years of a child’s life are a beautiful time. Black and white photos of your child sleeping or hugging Mum are a real treasure to be cherished forever. But don’t forget to capture those fun moments too – the moments that make you pull your hair out now but you look back on and laugh. Baby scrapbooking ideas like this are perfect for all those messy moments when your child is first learning the joys (and tribulations) of food. Although this layout can be very effective in showcasing the different experiences your child has when starting to eat solid food, it is very simple to create.
The logical, symmetrical design of this page places the focus on your photos, which is exactly what you want it do and can be easily adapted to any theme.
This layout was created using Creative Imaginations Sonnets Green Wash paper, Creative Imaginations Yellow Squiggle paper, yellow cardstock and Suzy’s Zoo My First Food stickers.
Click Here To View Our Range Of Baby Stickers
To recreate this scrapbook page idea, follow these steps:
1. Creative Imaginations Sonnets Green Wash paper as your background. If you do not have this paper, any light green paper will do.
2. Crop three vertical photos to the same size and choose which order they will go in. Mat the two outer photos with yellow cardstock, leaving a 1.5cm gap above the photos (your word stickers will go here later). Mat your central photo with yellow cardstock, leaving a 1.5cm gap below the photo.
3. Cut a strip of Creative Imaginations Yellow Squiggle paper measuring approximately 14cm by 30.5cm. Your height will depend on the height of your photos. Just make sure it is tall enough to create a border around your photos when you eventually stick them down. Glue the strip horizontally across your page approximately 5cm from the top edge.
4. Glue your photos across the strip of yellow squiggle paper.
5. Add the words yummy, yucky and splat in the gaps you left above and below your photos. If you wish, you can first matt the stickers on cardstock, cut them out and then adhere them to your page. This just gives a little extra depth. You can also use foam tape to adhere them.
6. Place your title sticker in the middle of the gap above the yellow squiggle paper and embellish with a bib sticker.
7. Finally, place your character stickers in the bottom left and right corners, as shown in the layout above.
Click Here To View Our Range Of Baby Stickers
What do you think? Do you like this baby scrapbooking idea? Do you have any questions? Would you have done anything different? We’d love to hear from you! Please leave a comment below.


Thank you for all your news and scrapebooking ideas but i am only new at this and i still dont know which way to start.
Also that was a great idea of James to put on a sale for everyone to help out.
If i need any help i know i can rely on both of you but i have books here that was given to me so i can have a look at them whenever.
Have a good week and weekend
Yvonne
I am looking for ideas to do for adoption. I am relatively new at this and am looking for simple but cute ideas. Can you help??
Thanks,
Debbie
This is really cute, simple and eye appealing.
Your style is really unique in comparison to other people I have read stuff from.
Many thanks for posting when you’ve got the opportunity,
Guess I’ll just book mark this web site.
I like the helpful information you provide in your articles.
I’ll bookmark your blog and check again here regularly.
I am quite certain I will learn many new stuff right here!
Best of luck for the next!
I was curious if you ever thought of changing the page layout of your website?
Its very well written; I love what youve got to say.
But maybe you could a little more in the way of content so people
could connect with it better. Youve got an awful lot of text
for only having 1 or two pictures. Maybe you could space
it out better?
site…
Baby Scrapbooking Ideas – First Food…