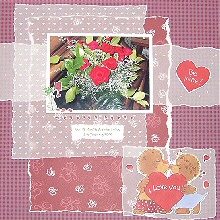
Vellum scrapbooking is so much fun. Vellum is a gorgeous medium which can be applied to many different scrapbooking projects to give them a unique look. This layout showcases the effectiveness of layering vellum.
I created this page to show off the roses my husband gave me on our 18 month anniversary. I wanted the page to follow a romantic theme while drawing attention to the redness of the roses. Hence, I chose a burgundy theme.
This layout was created using red plaid paper, Francheville red hearts paper, iridescent vellum, Hot of the Press white hearts vellum, white cardstock, a black pen and Suzy’s Zoo Ollie & Martha Valentines stickers.
Click Here To View Suzy’s Zoo Ollie & Martha Valentines stickers
To recreate this scrapbook page idea, follow these steps:
1. Use the red plaid paper as your background.
2. Cut a piece of Francheville red hearts paper measuring approximately 21cm by 28cm. Tear along each side to give a white edge. Glue vertically to your page approximately 4.5cm from the left edge and 1.5cm from the bottom edge.
3. Tear a strip of iridescent vellum approximately 8cm tall. Glue it across your page approximately 6cm from the top edge.
NOTE: Scrapbooking with vellum can be a difficult task. I often use a spray adhesive, but it can be messy, so I avoid it where possible. For this strip, spray adhesive was not necessary. Because I was placing my photo on top of the vellum, I simply placed the adhesive in the areas that would be covered up by the photo. I also placed adhesive in the area that I was later going to cover with a scrapbooking sticker. This way, the vellum was still glued down firmly, but I did not have to worry about messy adhesives or the adhesive being visible.
4. Tear a rectangle of Hot of the Press white hearts vellum measuring approximately 18cm by 21cm. Glue to your page approximately 2cm from the left edge and 1cm from the top edge. Again, you only need to use adhesive in the areas that will later be covered by your photo, so you don’t have to worry about your glue being visible.
5. Mat your photo with white cardstock. Glue to your page approximately 6.5cm from the left edge and 4.8cm from the top edge.
6. Use a black pen to journal on the white heart vellum below your photo. When you have finished your journaling, tear out a piece of white cardstock that is slightly bigger than the space your journaling takes and glue it underneath the vellum to make your journaling stand out.
7. Place the small rose sticker in the bottom left corner of the photo and a string of small heart stickers underneath.
8. Tear a rectangle of iridescent vellum measuring approximately 13cm by 9.5cm. Place your large Ollie & Martha sticker in the middle and three small heart stickers around it. Glue in the bottom right corner of your page. Again, you only need to place adhesive in the areas covered by your stickers.
9. Finally, place the large ‘Be Mine’ heart sticker on the vellum next to your photo, as shown above.
This is just one use for scrapbooking vellum. Please explore our other articles for more ideas and applications for this fantastic medium.
What do you think? Do you like this vellum scrapbooking idea? Do you have any questions? Would you have done anything different? We’d love to hear from you! Please leave a comment below.


