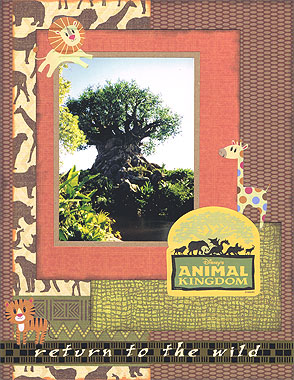
I don’t know about you, but I always seem to have lots of photos from zoos, animal theme parks and aquariums so this week I thought I would take a stroll on the wild side and experiment with some adorable new Party Animal rub-ons from Imaginisce.
Click Here To View Our Animal Rub-Ons

Materials Used: Safari Chic papers from Diecuts With A View, brown cardstock, black ink, orange ink, Disney ‘Return To The Wild’ border sticker, Disney ‘Animal Kingdom’ sticker and Imaginisce Party Animal Rub-Ons.
To recreate this scrapbooking idea using scrapbooking stickers, follow these steps:
1. Use a dark brown paper as your background. Cut it to 8 1/2 by 11 and ink around the edges with black ink.
2. Cut a strip of animal icons paper approximately 10cm wide. Ink the edges with orange ink and when dry, glue down your page approximately 1cm from the left edge.
3. Cut a piece of green paper measuring approximately 14cm by 8cm. Ink around the edges with black ink. When dry, glue horizontally to your page approximately 1cm from the right edge and 3.6cm from the bottom edge.
4. Cut a piece of orange paper measuring approximately 15cm by 18.5cm. Ink around the edges with black ink. When dry, glue vertically to your page approximately 2.7cm from the left edge and 2.2cm from the top edge.
5. Mat a vertical 4×6 photo with brown cardstock and glue on top of your orange paper. It should be about 1.6cm from the top of your orange paper and 1.3cm from the left edge of your orange paper.
6. Place a lion animal rub-on across the top left corner of your photo, as shown in the scrapbooking idea above.
7. Select a ribbon, border sticker or strip of paper and place across the bottom of your page approximately 1.2cm from the bottom edge. I have used a Disney ‘Return To The Wild’ border sticker but you can use whatever you wish.
8. Place a tiger animal rub-on in the bottom left corner of your page so that it is sitting on your border strip from step #7.
9. Place a giraffe animal rub-on the right side of your page. I suggest you position it so that it is standing towards the top right corner of your green paper and its neck goes up the edge of your orange paper, as shown in the scrapbooking layout above.
10. Finally, place your title towards the bottom right corner of your photo, as shown. I have used a pre-made Disney Animal Kingdom sticker, but if you don’t have a pre-made title, you could make your own. For example, you could cut out a circle from cardstock and use alphabet stickers, stamps or rub-ons to write your title on that.
I love how the animal rub-ons compliment the theme of my page. Why not pull out some of your old photos of trips to the zoo and see what you can come up with?
Click Here To View Our Animal Rub-Ons
I’d love to hear what you think of this animal rub-ons idea. Please leave a comment in the comments box below.


