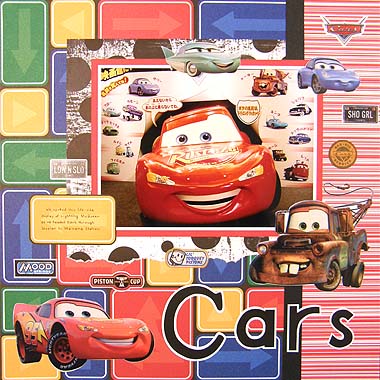
Sometimes using stickers on a layout can be just plain fun. And that’s just what this page was! I combined bright primary colours with Disney scrapbooking stickers to create a cheerful and playful page. While I have used a Disney Cars photo on this page, you could easily adapt the same idea to suit photos of your son playing with toy cars, a car-shaped birthday cake or even your husband taking a drive in the new car. The possibilities are endless. See what you come up with!
This layout was created using Reminisce Which Way paper, Doodlebug Ladybug Sweet Stripes paper, Junkitz Basic Circles White paper, white cardstock, red cardstock, black cadstock, black ink, a black pen and Sandylion Disney Cars stickers.
To recreate this scrapbook page idea, follow these steps:
1. Use the Reminisce Which Way paper as your background. Position it so the green arrow pointing down is in the top left corner. Cut out a long yellow arrow from the right side of your page. This area will be covered up shortly.
2. Cut a strip of Doodlebug Ladybug Sweet Stripes paper approximately 7cm wide. Make sure the stripes are horizontal. Glue down the right side of your page, as shown in the layout above. This will cover the area you removed the yellow arrow from.
3. Lightly ink all the way around the edges of your page with black ink.
4. Cut a piece of Junkitz Basic Circles White paper measuring approximately 18cm by 18cm. Tear along the bottom edge. Adhere to your page so that it is up against the red stripes paper and approximately 3.3cm from the top edge.
5. Cut a strip of black cardstock approximately 1.5cm wide. Adhere vertically down your page to cover the join between your background paper and the red stripes paper.
6. Mat a 5×7 photo with white cardstock and again with red cardstock. Adhere to your page approximately 5cm from the top edge and 5cm from the right edge.
7. Place your Mater sticker (the brown truck) so that it covers the bottom right corner of your photo. If you wish, you can first mat the sticker with white cardstock for extra depth and to help it stand out.
8. Place your Lightning McQueen sticker in the bottom left corner of your page, as shown in the layout above. Again, if you wish, mat this sticker with white cardstock.
9. Cut out the letters for your title from black cardstock. Mat each letter with white cardstock and arrange them in the bottom right corner of your page to form your title.
10. Using a black pen, add your journaling to the yellow arrow sign you cut out previously. Glue to your page so that it covers the bottom left corner of your photo.
11. Finally, use your remaining stickers to decorate the rest of your page, as shown above.
What do you think? Do you like this Disney scrapbooking idea? Do you have any questions? Would you have done anything different? We’d love to hear from you! Please leave a comment below.


Can I order all the papers, stickers, etc. to make this scrapbook page it would delight my grandson.
I love this idea as well as the other ones. My daughter and I have many photos of disney and i was wondering how to do them. Now I know
thanks
Unquestionably imagine that which you stated. Your favorite reason appeared to be at the net the easiest thing to understand of.
I say to you, I definitely get annoyed at the same time as folks think about issues that they just
do not understand about. You managed to hit the
nail upon the highest and also outlined out the entire thing without
having side-effects , other folks could take a signal. Will
likely be again to get more. Thanks
I agree, using stickers on a layout can be a lot of fun! I love how you used bright primary colors and Disney scrapbooking stickers to create a cheerful and playful page. The photo of the Disney Cars character really ties the whole page together.