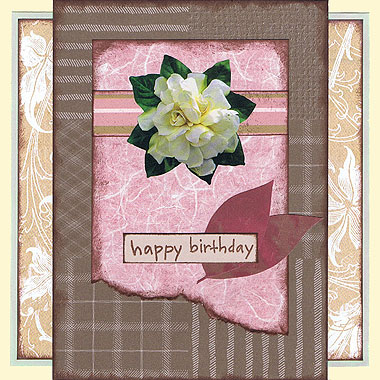
Our new range of Paper House stickers are the perfect sized embellishment for creating beautiful and one-of-a-kind handmade cards for your friends and family. And their realistic appearance makes them extra special. So I decided to feature one of my favourites (the Gardenias sticker) on my latest card. I hope you like it!
Click Here To View Our Range Of Paper House Stickers

Materials Used: Cream cardstock, green cardstock, Foofala brown patterned paper, Patchwork Cocoa Plaid paper, It Takes Two Pink Fibre paper, Scrapbooking Memories Pink and Brown paper, Basic Grey paper (for the leaves), brown cardstock, brown ink, pink ink, a ‘Happy Birthday’ stamp and Paper House Gardenias stickers.
To recreate this card making idea, follow these steps:
1. Cut a piece of cream cardstock measuring 14cm by 28cm. Fold in half to create a card. Place in front of you with the fold down the left side.
2. Cut a piece of Foofala brown paper measuring 12.6cm by 12.6cm. Ink the edges with brown ink. When dry, mat with green cardstock. Ink the edges of the green cardstock with pink ink and when dry, glue to the centre of your card.
3. Cut a piece of Patchwork Cocoa Plaid paper measuring 10cm by 14cm. Ink the edges with brown ink. When dry, glue down the centre of your card, as shown above.
4. Cut a piece of It Takes Two Pink Fibre paper measuring 7.2cm by 11cm. Tear along the bottom edge, as shown in the card idea above. Ink the edges with brown ink and when dry, glue in the centre of your card.
5. Cut a piece of Scrapbooking Memories Pink and Brown paper measuring 7.2cm by 1.6cm. Ink the edges with brown ink. When dry, glue across your pink fibre paper approximately 1.9cm from the top edge.
6. Place your Gardenia sticker so that it is centred on top of your pink and brown paper from step #5.
7. Cut out two leaf shapes from Basic Grey paper (or any paper of your choosing). Arrange them one on top of the other towards the bottom right corner of your pink fibre paper, as shown in the card idea above. When you are happy with their placement, glue them down.
8. Using brown ink, stamp a ‘happy birthday’ message on a piece of brown cardstock. When dry, cut down to size and then ink the edges with brown ink. Again, when dry, glue to your card, as shown above.
And you’re done! You now have a beautiful and unique birthday card to give someone special on their next birthday. And as you can see, the Paper House sticker makes a gorgeous central feature of your design.
Click Here To View Our Range Of Paper House Stickers
I’d love to hear your thoughts and ideas for using Paper House stickers on your layouts and what you think of this page. Please leave a comment in the comments box below.


