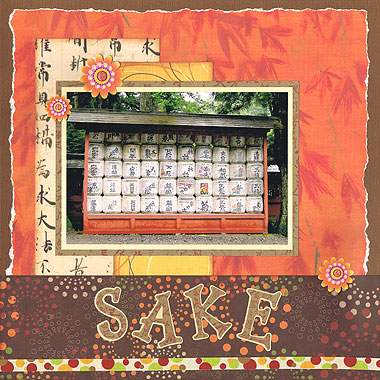
I’m always looking for ways to add a little dimension to my scrapbooking layouts. Ribbons, brads and chipboard are the obvious choice, but a lot of the time, I find myself reaching for 3D stickers (and my favourite brand of 3D stickers – Sandylion). They are perfect for adding a little something extra to my pages without being brash or too bulky.
Click Here To View Our 3D Sandylion Stickers

Materials Used: Textured brown cardstock, Creative Imaginations Maple paper, NRN Asian Text on Parchment paper, My Minds Eye Spooked Orange Swirls paper, Reminisce Autumn Burst paper, light brown cardstock, brown cardstock, different shades of brown ink, Asian Text stamp, ribbon and Sandylion 3D Sunburst Flowers stickers.
To recreate this scrapbooking idea using 3D scrapbooking stickers, follow these steps:
1. Use a textured brown cardstock as your background.
2. Tear approximately 1cm away from each side of your Creative Imaginations Maple paper to give it a nice white edge and glue in the centre of your page.
3. Cut a piece of NRN Asian Text on Parchment paper measuring approximately 10cm by 27.3cm. Ink around the edges with brown ink. When dry, glue vertically to your page approximately 2.8cm from the left edge. The bottom edge should sit on the bottom edge of your page.
4. Cut a piece of My Minds Eye Spooked Orange Swirls paper measuring approximately 8cm by 25.3cm. Ink around the edges with brown ink. When dry, glue vertically to your page approximately 9.1cm from the left edge. The bottom edge should sit on the bottom edge of your page.
5. Cut a strip of Reminisce Autumn Burst paper approximately 8.3cm tall. Ink around the edges with brown ink. When dry, glue horizontally along the bottom edge of your page.
6. Mat a horizontal 5×7 photo with light brown cardstock and again with brown cardstock.
NOTE: For added effect, before you mat your photo a second time, use an Asian text stamp and brown ink to stamp images all over your photo mat. When dry, mat your photo.
7. Glue your matted photo approximately 4.5cm from the left edge and 6.5cm from the top edge.
8. Cut the letters of your title out of brown cardstock and mat each one with light brown cardstock.
NOTE: Again for added interest, you could stamp images all over your letters before you mat them, as I have done in the scrapbooking layout above.
9. Glue your title across your Autumn Burst paper at the bottom of your scrapbooking page, leaving room to place a ribbon underneath.
10. Cut a length of ribbon about 3cm wider than your page and glue across the bottom of your page approximately 0.5cm above the bottom edge.
11. Finally, place two 3D Sunburst flower stickers near the top left corner of your photo and a third towards the bottom right corner of your page, as shown above.
The 3D flower stickers make a gorgeous embellishment for my layout. They are understated yet elegant and beautiful. And they don’t weigh my page down at all. Try incorporating some 3D stickers into your scrapbooking layouts and see what you can come up with!
Click Here To View Our 3D Sandylion Stickers
I’d love to hear what you think of this 3D stickers idea. Please leave a comment in the comments box below.


love the sake page, would never have thought to mix so many different colours together
Thanks so much Vivienne…I’m so glad you like my page.