Scrapbooking brads make an appearance on many of my layouts – mostly when I need to hold a flower or ribbon in place. But sometimes, an extra special range of brads comes along that are so special that they deserve to be an embellishment in their own right.
Click Here To View Our Range Of Scrapbooking Brads
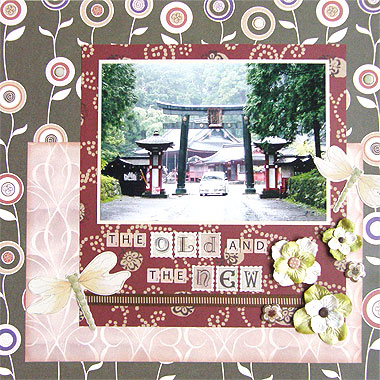
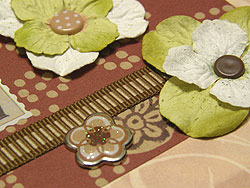
That’s what happened when I saw our latest range of brads from Doodlebug Designs, especially the Bon Bon brads. I just couldn’t wait to get scrapping with them! The flower brads are just gorgeous! They have a glittery brown and white centre and a silver rim. Very sophisticated and perfect for my latest vacation layout!

Materials Used: Imagination Project Time Of My Life paper, Magenta brown paper, red paper (brand unknown), light brown cardstock, All My Memories epoxy circle stickers, PSX Dragonflies stickers, Crystal Magic, Creative Imaginations Alphabet Stamps stickers, Making Memories Scrabble Tile Alphabet stickers, brown ribbon, brown ink, white and green flowers (brand unknown), two dark brown brads and Doodlebug Designs Bon Bon Brads.
To recreate this scrapbook page idea, follow these steps:
1. Use the Imagination Project Time Of My Life paper as your background.
2. Cut a piece of Magenta brown paper measuring 26.5cm by 17.5cm. Ink the edges with brown ink and when dry, glue towards the bottom right corner of your page approximately 1.5cm from the right edge and 1.5cm from the bottom edge.
3. Cut a piece of red paper measuring 21cm by 22.5cm. Glue to your page approximately 2.8cm from the right edge and 4.4cm from the bottom edge.
4. Mat a horizontal 5×7 photo with light brown cardstock. Glue to your page towards the top of your red paper from the previous step (please see scrapbooking layout above for positioning).
5. Cut a piece of brown ribbon 21cm long. Glue across your red paper approximately 1.6cm above the bottom edge of the red paper, as shown above. Don’t worry what the ends look like. They will be covered over later.
6. Select two dragonfly stickers, one slightly larger than the other. Mat both of them with light brown cardstock. If you like, paint each with Crystal Magic for a more dimensional effect.
When dry, glue one dragonfly towards the bottom left corner of your red paper (as shown above) so that it covers the end of your ribbon. Glue the other towards the top right corner of your Magenta brown paper so that it overlaps your photo a little. It will probably go over the edge of you page, so make sure you trim away the excess.
You are now going to create the arrangement of flowers in the bottom right corner of your page
7. Select a large green flower and a medium white flower. Attach them with a brown brad towards the bottom right corner of your red paper and overlapping your ribbon.
8. Select a medium white flower and a small green flower. Attach them with a light brown polka dot brad from Doodlebug Bon Bon Brads above and to the left of the first flower.
9. Select a small green flower and a mini white flower. Attach them with a small brown brad above and to the right of the second flower

10. Now add two flower brads from Doodlebug Bon Bon Brads to your flower arrangement for that extra special touch. If you are not sure where to place them, please look at the layout above.
11. Using alphabet stickers, write your title in the space remaining below your photo.
12. Finally, place two or three epoxy circles in the centre of some of the flowers still showing from your background paper. It just gives your scrapbooking layout that extra little lift.
And you’re done! Another special layout for your scrapbooking album. As you can see, the brads I have used here really lift the design of the page up by adding extra dimension and texture plus a touch of sophistication.
Click Here To View Our Range Of Scrapbooking Brads
I’d love to hear your thoughts and ideas for using scrapbooking brads on your layouts and what you think of this page. Please leave a comment in the comments box below.


