Our exclusive Merry Christmas Cut-Outs (free with any order over $60 during our birthday sale) have already proven immensely popular. I haven’t counted how many we have sent out yet, but there does seem to be one order after another.
If you haven’t got yours yet, it’s not too late. Simply place an order over $60 (not including postage) before the end of our Birthday Sale at midnight on December 10th, 2009 and get yours for FREE. But hurry, these are exclusive to Stickers N Fun and will not be available after December 10th.
Click Here To See What’s On Sale Now!
Since our Merry Christmas Cut-Outs have been such a hit, I thought I would share with you a few ideas on how you might use them. Here are three Christmas card ideas you might like to try:


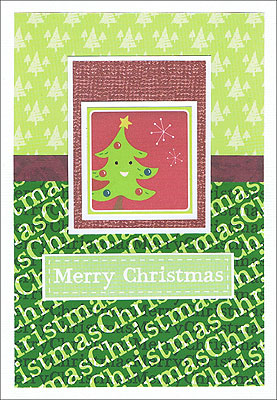
Merry Christmas Card Idea 1: Merry Christmas Tree

This card was created using white Bazzill cardstock, Simply Cards Magazine Green Christmas Tree paper, Simply Cards Magazine Green Merry Christmas paper, scraps of red patterned paper, white cardstock, a ‘Merry Christmas’ message from Simply Cards magazine and Stickers ‘N’ Fun exclusive Merry Christmas Cut-Outs.
To recreate this card making idea, follow these steps:
1. Cut a piece of white Bazzill cardstock measuring 15cm by 20.8cm. Fold in half to create a card.
2. Turn your card so the fold is along the left.
3. Cut a piece of Simply Cards Magazine Green Christmas Tree paper measuring 9.4cm by 7cm. Glue to your card so that it is centred horizontally and is approximately 0.5cm from the top edge.
4. Cut a piece of Simply Cards Magazine Green Merry Christmas paper measuring 9.4cm by 8cm. Glue to your card so that it is centred horizontally and is approximately 0.5cm from the bottom edge. The side edges should be in line with the edges of your Christmas Tree paper from Step #3.
5. Cut a strip of red patterned paper (any scrap will do) measuring approximately 9.4cm by 1cm. Glue across the join between your two patterned papers.
6. Mat your Christmas Tree Cut-Out with white cardstock, then with red patterned paper (again, any scrap will do) and again with white cardstock. Glue to your card so that it is centred horizontally and is approximately 2.2cm from the top edge.
7. Finally, place your ‘Merry Christmas’ message beneath your Christmas tree, as shown on the card above.
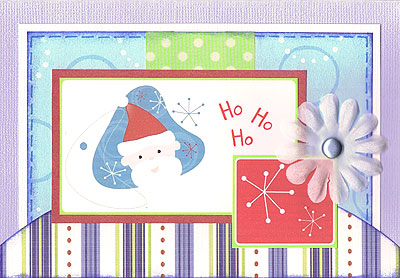
Merry Christmas Card Idea 2: Ho Ho Ho

This card was created using Blue Bazzill cardstock, White Bazzill cardstock, Provo Craft Blue Circles paper, Simply Cards Magazine Green Dots paper, Chatterbox Rec Room Stripe paper, red cardstock, blue ink, a blue pen, a red pen, one white flower, one blue brad and Stickers ‘N’ Fun exclusive Merry Christmas Cut-Outs.
To recreate this card making idea, follow these steps:
1. Cut a piece of blue Bazzill cardstock measuring 15cm by 20.8cm. Fold in half to create a card.
2. Turn your card so the fold is along the top.
3. Cut a piece of Provo Craft Blue Circles paper measuring 11.8cm by 8cm. Ink all the way around the edges with blue ink. When dry, use a blue pen to draw a dashed border, as shown above. Mat with white cardstock and glue to your card so that it is centred horizontally and is about 0.9cm from the top edge.
4. Cut a piece of Simply Cards Magazine Green Dots paper measuring 4cm by 8cm. Ink along the top edge with blue ink. When dry, glue to your card so that it creates a strip down the middle of your Blue Circles paper, as shown above.
5. Cut a piece of Chatterbox Rec Room Stripe paper measuring 15cm by 3cm. You can leave it as a rectangle or, if you like, cut the top edge in a curve as I have done (see picture above). Ink all the way around the edges with blue ink. When dry, glue along the bottom edge of your card.
6. Mat your Santa Claus Cut-Out with red cardstock and glue to your card approximately 2cm from the left edge and 2.5cm from the top edge.
7. Glue your Red Stars Cut-Out approximately 2.4cm from the right edge and 1cm from the bottom edge. It will overlap with your Santa Claus Cut-Out
8. Use a red pen to write ‘Ho Ho Ho’ in the space remaining on your Santa Claus Cut-out. If you prefer, you can use alphabet stickers, rub-ons or stamps to write your sentiment.
9. Finally, attach a white flower with a blue brad just above your Red Stars Cut-Out, as shown above.
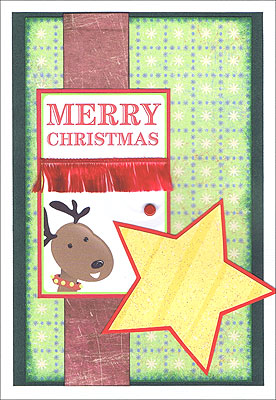
Merry Christmas Card Idea 3: Merry Christmas Reindeer

This card was created using white Bazzill cardstock, green cardstock Kaisercraft Cheer Christmas Wish paper, a scrap of red patterned paper, Paper Garden Yellow Ribbon Stripe paper, red cardstock, green ink, black ink, red fibre, one red brad, glitter and Stickers ‘N’ Fun exclusive Merry Christmas Cut-Outs.
To recreate this card making idea, follow these steps:
1. Cut a piece of white Bazzill cardstock measuring 15cm by 20.8cm. Fold in half to create a card.
2. Turn your card so the fold is along the left.
3. Cut a piece of green cardstock measuring 9.4cm by 14cm. Glue in the centre of your card.
4. Cut a piece of Kaisercraft Cheer Christmas Wish paper measuring 8.5cm by 13.5cm. Ink around the edges with green ink. When dry, glue in the centre of your green cardstock.
5. Cut a strip of red patterned paper (any scrap will do) measuring approximately 2.5cm by 14cm. Ink around the edges with black ink. When dry, glue vertically to your card approximately 2.4cm from the left edge.
6. Wrap a red fibre around your Reindeer Cut-Out so that it sits in the space below the ‘Merry Christmas’ message, but above the reindeer.
7. Mat your Reindeer Cut-Out with red cardstock and glue vertically to your card approximately 1.4cm from the left edge and 3.8cm from the bottom edge.
8. Cut out a star shape from Paper Garden Yellow Ribbon Stripe paper. Mat with red cardstock. If you wish, cover your star with glitter for a bit of sparkle. When dry, glue at an angle towards the bottom right corner of your card, as shown above.
9. Finally, place a single red brad in the space between your red fibre and your star, as shown above.
*******************************************
I hope you enjoyed these Christmas Card Ideas.
Don’t forget you can still get your free set of Merry Christmas Cut-Outs. Just place an order over $60 (not including postage) during our birthday sale – where EVERYTHING is reduced – and we will send you a set for free.
Click Here To See What’s On Sale Now!
But be quick, you only have until midnight on Thursday 10th December, 2009 and then they will be gone forever.


If i had got this idea before i would have used these practise to make my own card. I have been using iHappy Holidays for a long time.
Fantastic site. Lots of useful info here. I am sending it to some friends ans also sharing in delicious.
And obviously, thank you to your sweat!
I’m now not sure where you are getting your information, however good topic.
I must spend some time studying much more or figuring out more.
Thank you for fantastic information I used to be searching
for this information for my mission.