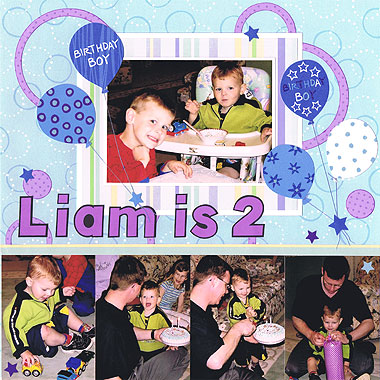
If you’re like me, you have mountains of birthday photos and are always looking for new birthday scrapbooking ideas. Nothing says it’s a festive occasion like balloons so when I saw these Birthday Boy Balloons stickers from Stickopotamus, I knew they would be perfect for my nephew’s second birthday photos.
Click Here To View Our Complete Range Of Birthday Stickers
Don’t forget to check out how I embellished the balloons too!

This layout was created using Provo Craft Blue Circles paper, Doodlebug Baby Boy Stripe paper, white cardstock, Beary Patch Grapebeary Dots paper, black cardstock, purple ink, purple alphabet stickers, blue thread and Stickopotamus Birthday Boy Balloons stickers.
To recreate this scrapbook page idea, follow these steps:
1. Use the Provo Craft Blue Circles paper as your background.
2. Cut out several ring shapes from Beary Patch Grapebeary Dots paper. It doesn’t really matter what size they are or even how many you have. You can also use solid circles or a combination of the two. You are just trying to create an interesting background. Use the layout above as an example.
3. Ink the edges of each ring or circle from the previous step with purple ink. When dry, glue randomly around your layout, keeping in mind the bottom third of your page will be covered later by photos.
4. Glue four 3×4 vertical photos in a row along the bottom of your scrapbooking layout.
5. Cut a strip of Doodlebug Baby Boy Stripe paper approximately 1cm tall. Glue horizontally across the top of your line of photos.
6. Mat a horizontally 4×6 photo with white cardstock. Mat again with Doodlebug Baby Boy Stripe and again with white cardstock. Glue in the centre of the space remaining above your line of photos.
7. Select the purple alphabet stickers you wish to use for your title and mat each one with black cardstock. Arrange towards the left side of your page, directly above your line of four photos, as shown above and glue in place.
8. Select five balloon stickers from Stickopotamus Birthday Boy Balloons stickers. Place each one on white cardstock and cut out. This enhances the brilliance of the blue, plus gives them dimension so they stand out from your page.
9. Tie a piece of blue thread to each balloon. Make sure each piece of thread is about 12cm in length. You can trim it down later.
10. Stick two balloons towards the top left corner of your photo, as shown above. Stretch the thread down to underneath your photo and secure in place with a blue star sticker. Trim your thread to the desired length.
11. Stick three balloons to the right of your photo, as shown above. Again, stretch the thread down to the desired location and secure in place with a blue star sticker. Trim your thread to the desired length.
12. Finally, place your remaining blue star stickers randomly around your page.
Click Here To View Our Complete Range Of Birthday Stickers
What do you think? Do you like this birthday scrapbooking idea? Do you have any questions? Would you have done anything different? We’d love to hear from you! Please leave a comment below.


Good Afternoon, I came across your website as I am in need of some Birthday Boy balloon stickers. I need about 50 of them. Did you buy them in a pack.
Thanks for your help.
Jennifer
I’m gone to say to my little brother, that he should also pay
a quick visit this weblog on regular basis to gget
updated from most recent news.
Nice respond in return of this query with genuine arguments and describing
the whole thing concerning that.