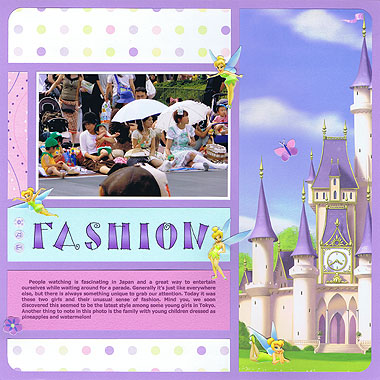
It’s time for a little bit of magic – Disney magic! I’ve been playing around with Sandylion’s new 3D stickers, and in particular, their 3D Tinkerbell stickers.
Click Here To View Our Range Of Disney Stickers
I love the way Sandylion’s 3D stickers pop out of the page at you. They make your page look so sophisticated and create a truly dimensional layout. But they are not too heavy and bulky so you can sprinkle them around your layout to create the sensational look of 3D without weighing your page down.

Materials Used: Purple cardstock, Hunter Leisure Disney Castle paper, Provo Craft Dots paper, Provo Craft Pink Swirls paper, blue Bazzill cardstock, pink Bazzill cardstock, white cardstock, corner rounder, purple alphabet stickers (2 sizes) and Sandylion 3D Tinkerbell stickers.
To recreate this scrapbook page idea, follow these steps:
1. Use the purple cardstock as your background.
2. Cut a piece of Hunter Leisure Disney Castle paper measuring 10.6cm by 29cm. If you don’t have this paper, any paper will do. However, I do recommend you choose a paper with a dominant pattern you like as it will become a main feature of your page.
Using a corner rounding punch, round the top right and bottom right corners of your page. Glue vertically to your page approximately 7mm from the right edge and 7mm from the bottom edge.
3. Cut a piece of Provo Craft Dots paper measuring 17.8cm by 4.4cm. Using a corner rounding punch, round the top left corner. Glue horizontally in the top left corner of you page approximately 7mm from the left edge. Make sure the top edge is inline with the top edge of your castle paper from Step #2.
4. Mat a horizontal 4×6 photo with white cardstock. Glue to your page 7mm below your dots paper from Step #3. Make sure the right edge of your photo and the right edge of your dots paper are inline with each other.
5. Cut a piece of Provo Craft Pink Swirls paper. The exact dimensions will depend on your photo. The height should be the same as your matted photo. The width should be the distance from the left edge of your page to the right edge of your photo mat minus 1.4cm.
Glue vertically next to your photo so that the left edge is inline with the left edge of the dots paper above it and the top and bottom edges are inline with the top and bottom edges of your photo mat.
6. Cut a piece of blue Bazzill cardstock measuring 17.8cm by 4.3cm. Glue horizontally 7mm below your photo mat. Make sure the right edge is inline with the right edge of your photo mat.
7. Using purple alphabet stickers, write your title in the centre of your blue Bazzill cardstock.
8. Cut piece of pink Bazzill cardstock measuring 17.8cm by 4.8cm. Glue horizontally 7mm below your blue cardstock. Again, make sure the right edge is inline with the right edge of your photo mat.
9. Write your journaling on the pink Bazzill cardstock.
10. Cut a piece of Provo Craft Dots paper. It should be 17.8cm wide, but the height will depend on you. The height should be the distance from the bottom of the page to the bottom edge of your pink cardstock minus 1.4cm.
Using a corner rounding punch, round the bottom left corner and then glue horizontally to your page approximately 7mm from the bottom edge. The bottom edge should be in line with the bottom edge of your castle paper and the left edge should be inline with the left edge of the pink cardstock above it.
11. Finish of your page by placing your 3D Tinkerbell stickers in key positions, as shown in the scrapbooking layout above.
And voila! A magical layout complete with 3D Tinkerbell stickers. This concept can easily be adapted to suit any theme or photos you wish. Have a go and have some fun!
Click Here To View Our Range Of Disney Stickers
I’d love to hear your thoughts and ideas for using 3D Tinkerbell stickers on your layouts. Please leave a comment in the comments box below.


Excellent weblog here! Additionally your site rather a lot up fast!
Whatt host aree you the usage of?Can I am getting your affiliate hyperlink to your host?
I desire my web site loaded up as fadt aas yours lol